
![]()

TUTORIALS
Making shaft damask with ArahWeave (updated November 14, 2022; ArahWeave 9.7i)
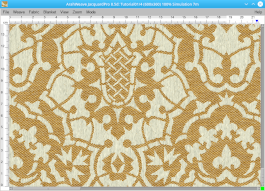
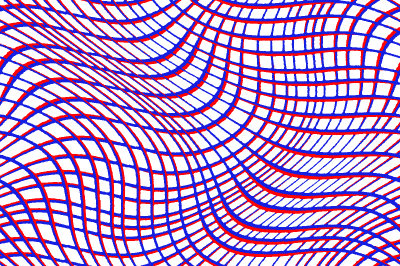
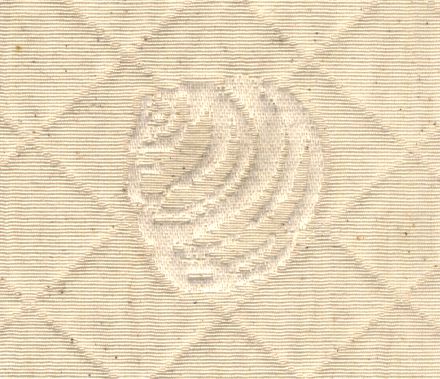
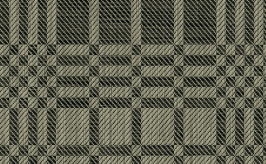
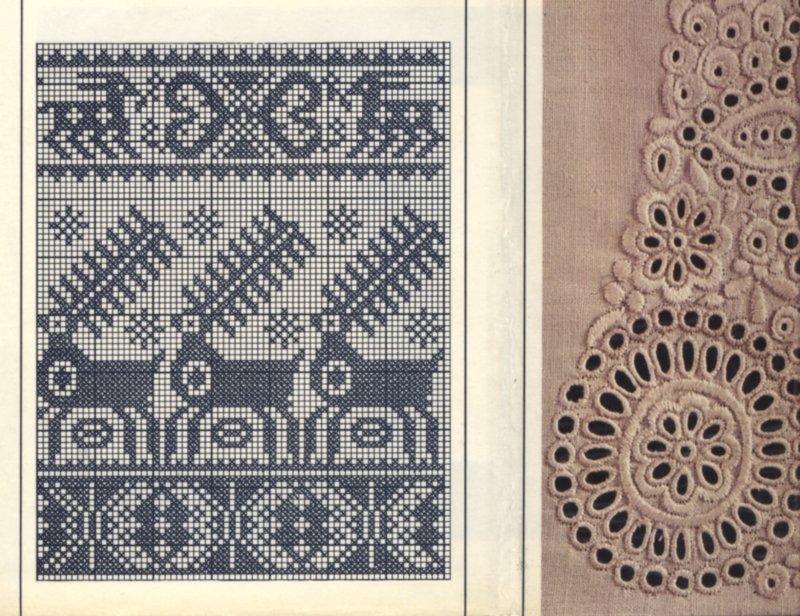
In this tutorial, we will make a shaft damask fabric. The weave of the scanned fabric is quite big, but the fabric was nevertheless woven on dobby looms. It consists of two basic weaves: one is a warp-way twill ![]() and the other is a weft-way
and the other is a weft-way ![]() twill. These two twills are arranged in a repeating pattern. The construction of the pattern is quite simple, and using a powerful tool like ArahWeave, you can finish it in 2 minutes. This is where the dual dobby/jacquard nature of ArahWeave shows its strength.
twill. These two twills are arranged in a repeating pattern. The construction of the pattern is quite simple, and using a powerful tool like ArahWeave, you can finish it in 2 minutes. This is where the dual dobby/jacquard nature of ArahWeave shows its strength.
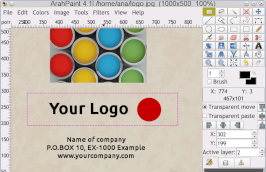
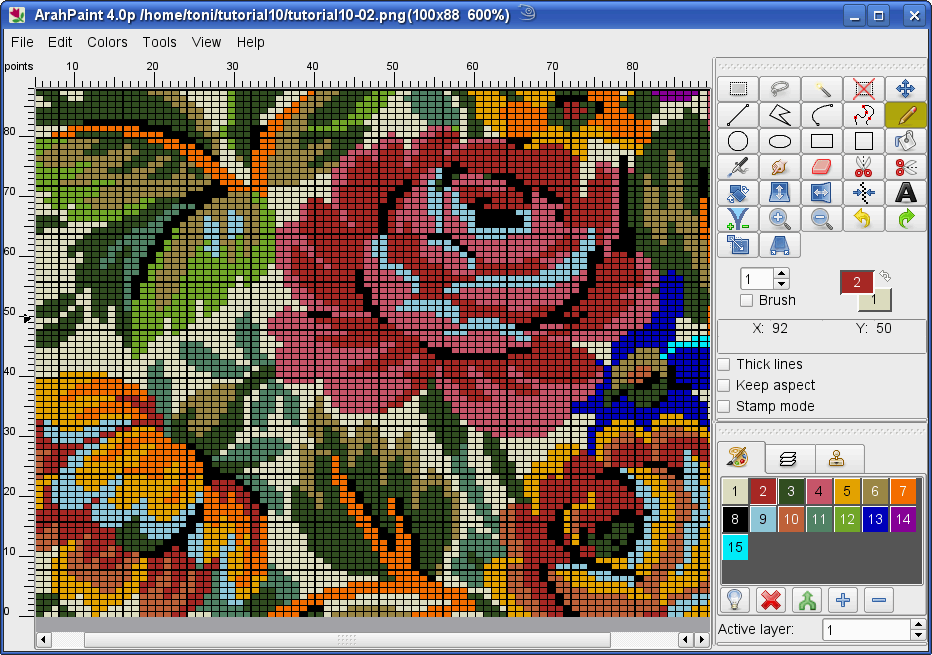
It would take considerable time to draw this weave point by point, even with the help of all the tools for automatically repeating a smaller pattern section. We will pull a few tricks up our sleeves, so you learn something new. We will treat this weave as if it was a jacquard and draw the picture (motif) into which we will replace each color area with a weave. But instead of using ArahPaint to draw the motif, we will use ArahWeave‘s weave editor, since we can do it faster this way. At the end, we will optimize the number of shafts, and we will have a big dobby weave drawn in no time at all.
First you have to find the repeat and develop the pattern motif. We will later use the motif to replace the two motif colors with the two twills. Each block of the motif represents a repeat of 4 ends and 4 picks. The smallest square in the fabric has a repeat of 8 ends and 8 picks. It will be represented in a motif with a square size of 2 by 2 points. The repeat in the napkin is 288×288. The motif will be 4 times smaller, therefore its size will be 72×72. We will draw it as a weave in the weave editor.
If you find it hard to follow our “mathematical” explanation, just skip ahead and try to understand what we are doing by looking at the pictures. We are not cheating, and there is a logic behind the whole thing 😉
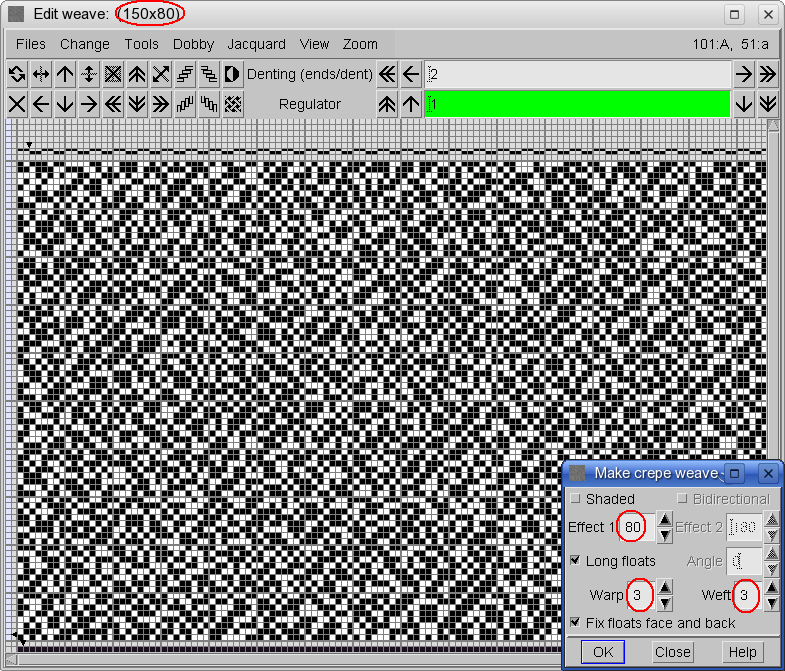
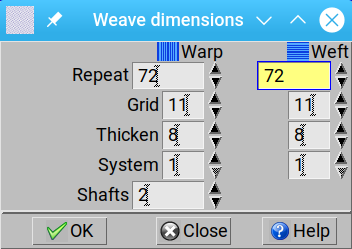
Open ArahWeave. The program initially contains a default fabric. Let us start with the weave. Choose Weave > Edit. Delete contents of weave editor by clicking Clear ![]() in the Toolbox. Then select Edit > Dimensions. Set the dimension of the weave which you will draw.
in the Toolbox. Then select Edit > Dimensions. Set the dimension of the weave which you will draw.
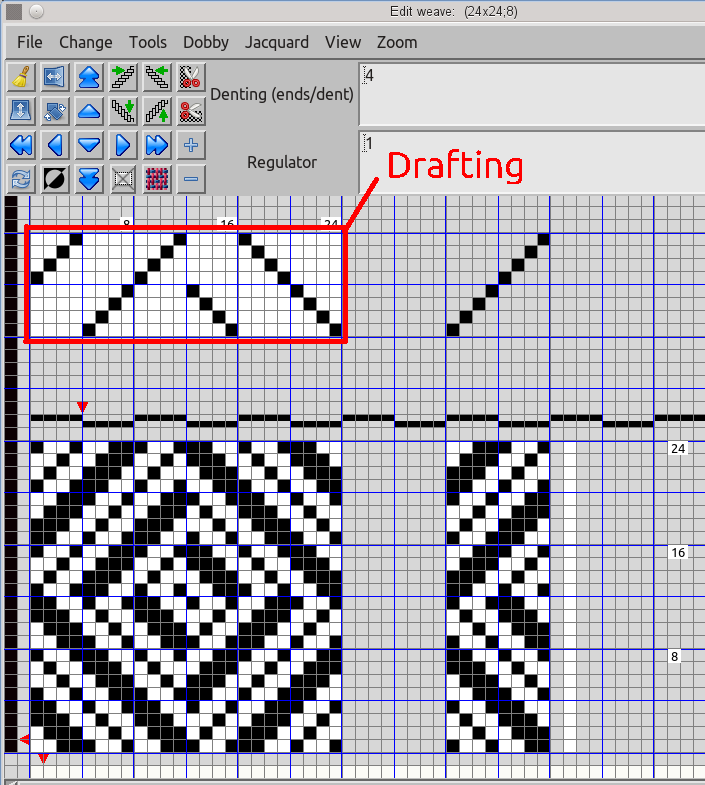
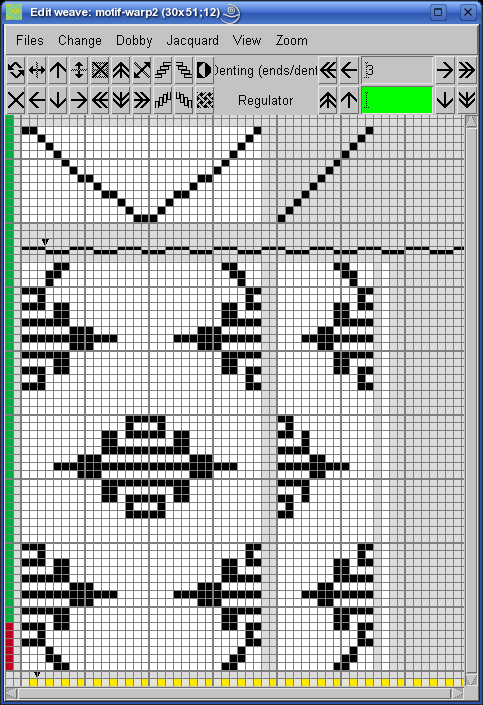
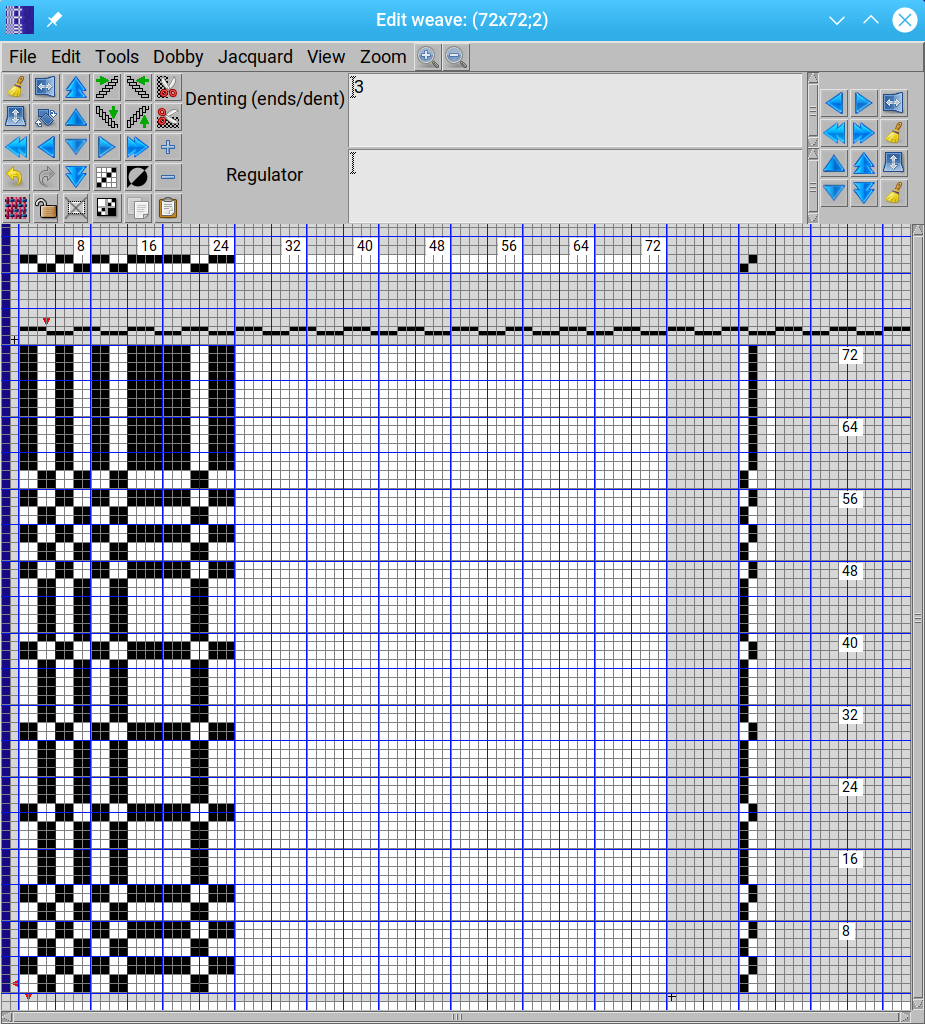
Draw a peg plan (also cold a lifting plan or dobby card) at the right side of the weave editor. Use the left mouse button for drawing black points (warp up) in the weave editor, and right mouse button to erase them. You will need just two shafts for the motif. On the top of the weave editor you have to draw the draft. Notice that the draft is equal to the dobby card from the bottom. As you will draw the draft, the card will be automatically copied in the weave.
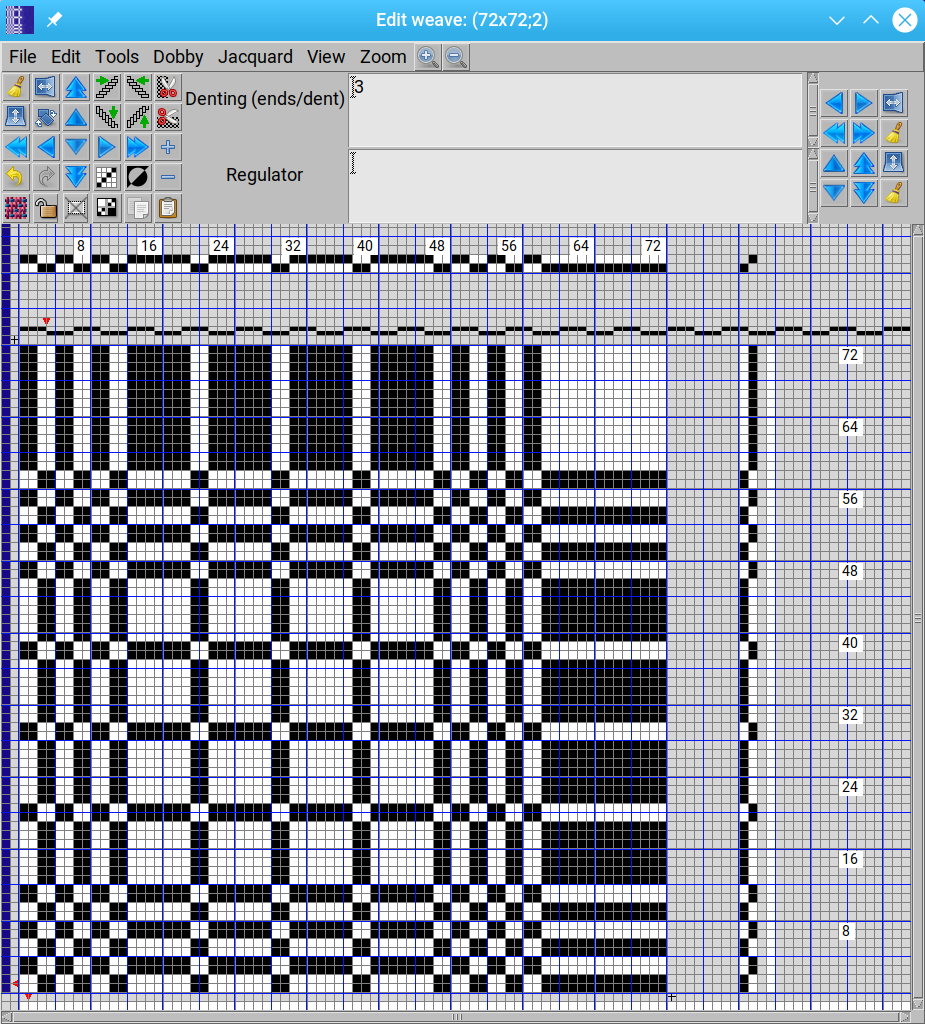
Finished weave looks like this:
Then click Copy ![]() in the Toolbox (or choose Edit > Copy or press Ctrl+C on the keyboard) to place the weave into clipboard for future use.
in the Toolbox (or choose Edit > Copy or press Ctrl+C on the keyboard) to place the weave into clipboard for future use.
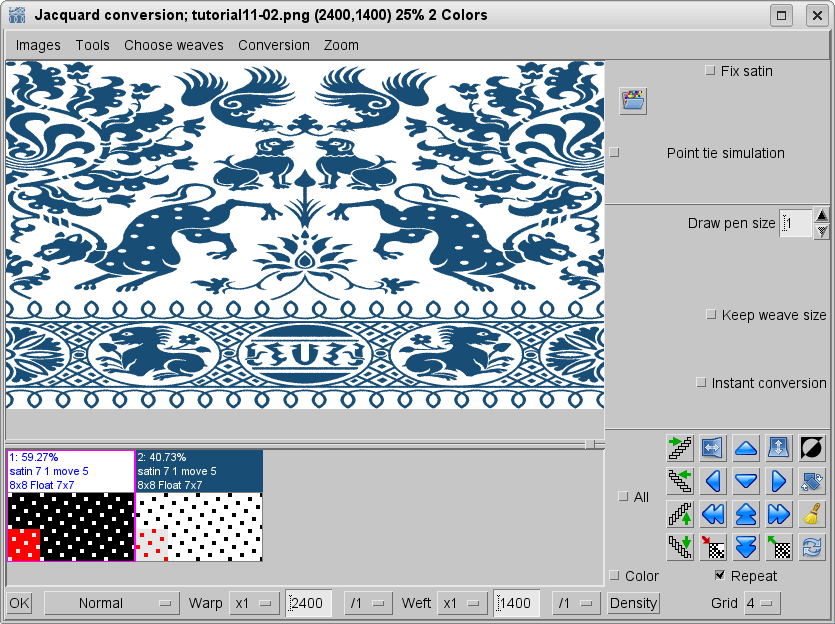
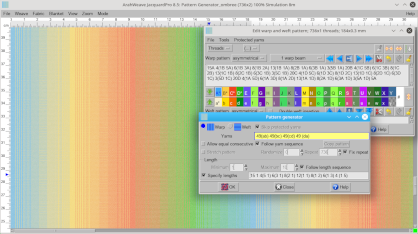
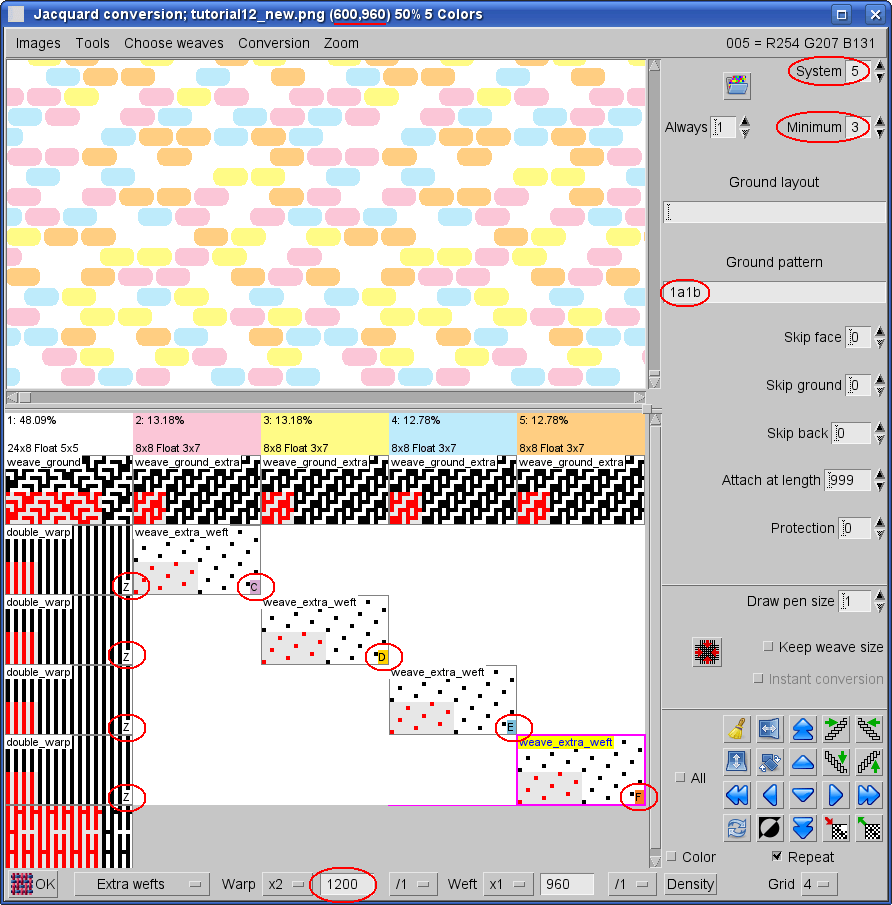
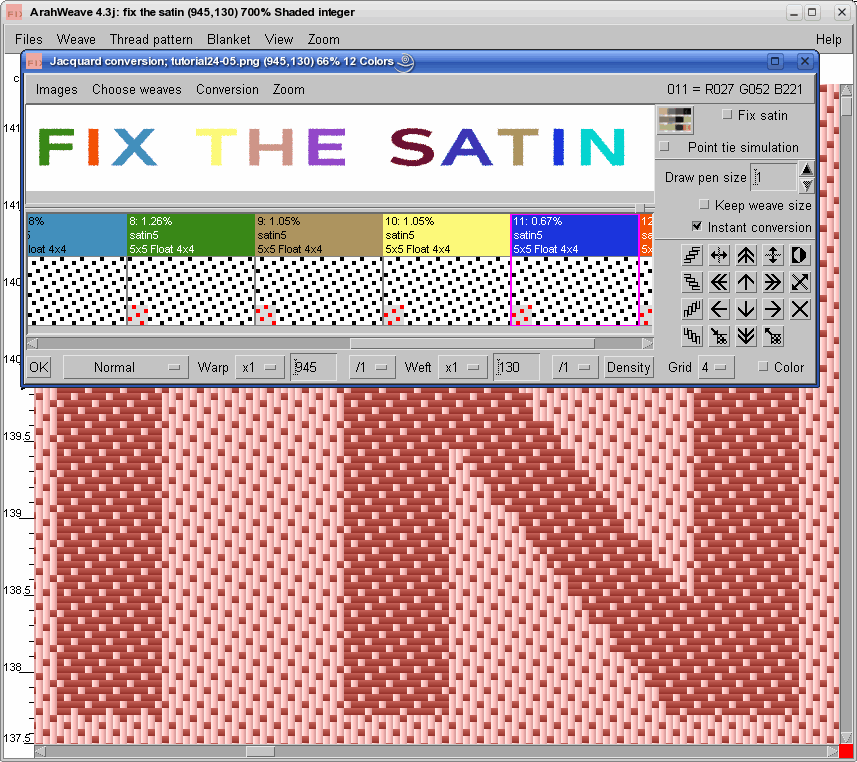
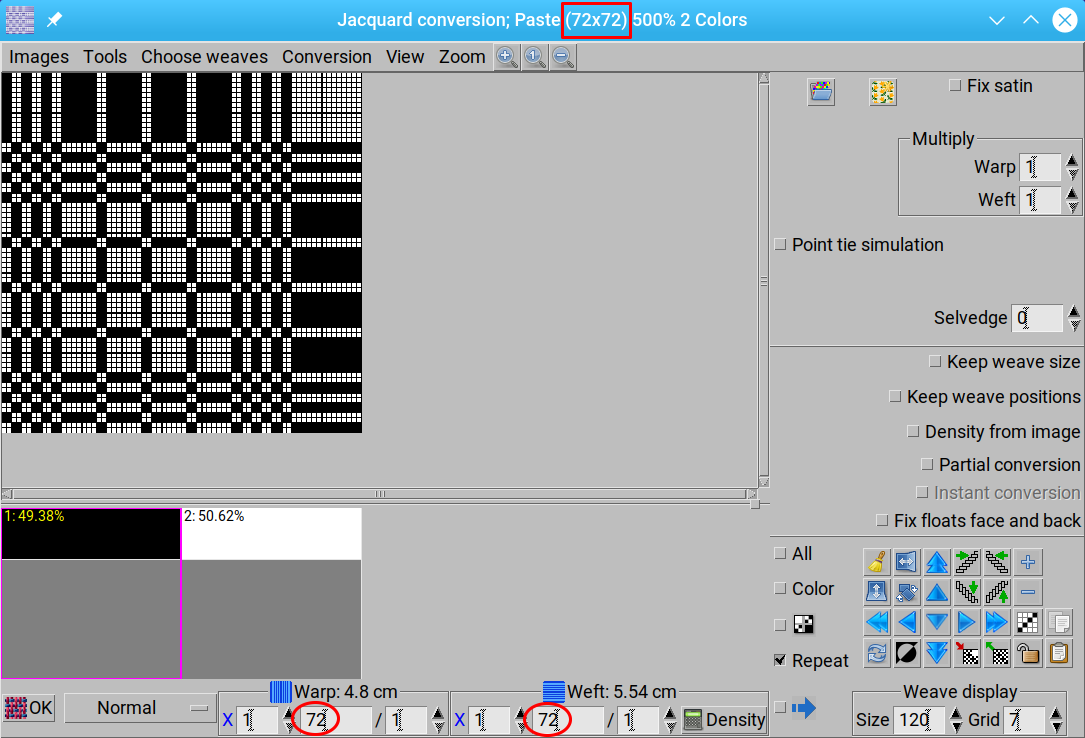
This future use will happen in a few seconds. Open the Jacquard conversion window using Weave > Jacquard conversion from the ArahWeave’s main menu, and select Tools > Paste (or press Ctrl+V) in the menu of the Jacquard conversion window. The motif (weave), which you have drawn, is now a 72×72 two-color image in the Jacquard conversion window.
As we found at the beginning of this tutorial, the size of fabric’s repeat is 288×288, so you must scale the image to this size. The most convenient way is to do it directly in the jacquard conversion window. You can enter numbers in the warp and weft boxes, or increase the X (multiply by) number to 4 (it will multiply the size 72 by 4).
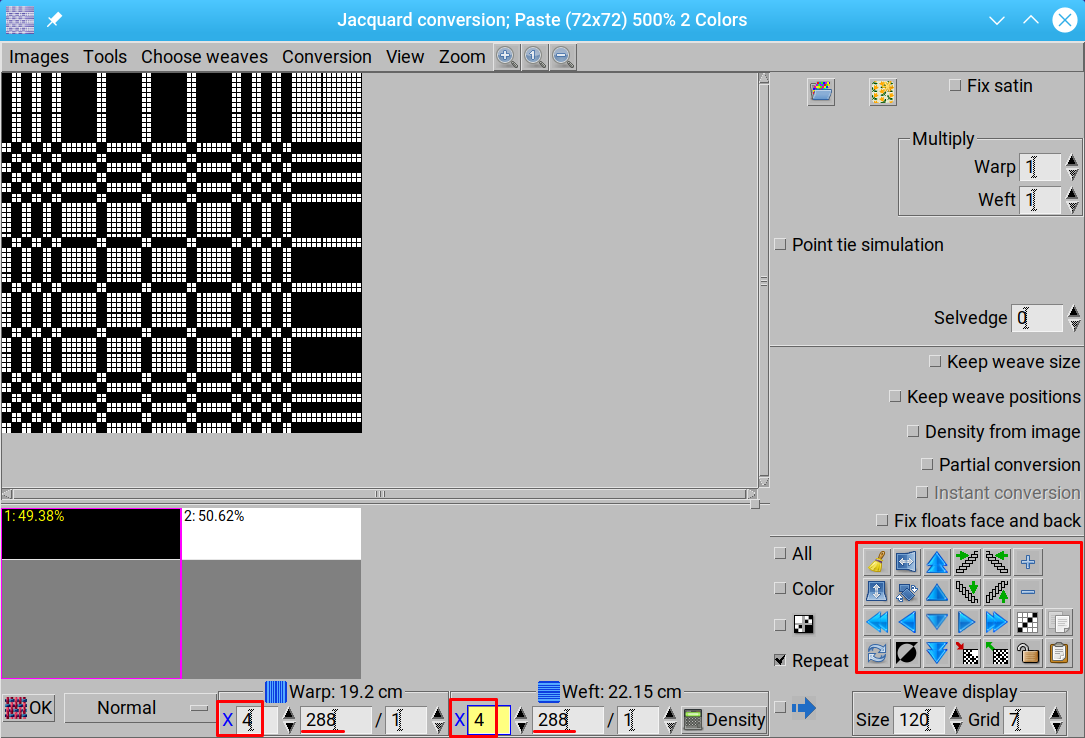
You should now load one weave for each color. Click the first color (black) below the image in the Jacquard conversion window. If you have created weaves already, select Chose weaves > Browse, and load weaves from the weave browser. But you can create these two twill weaves faster with the weave-editor tools in the Jacquard conversion window.
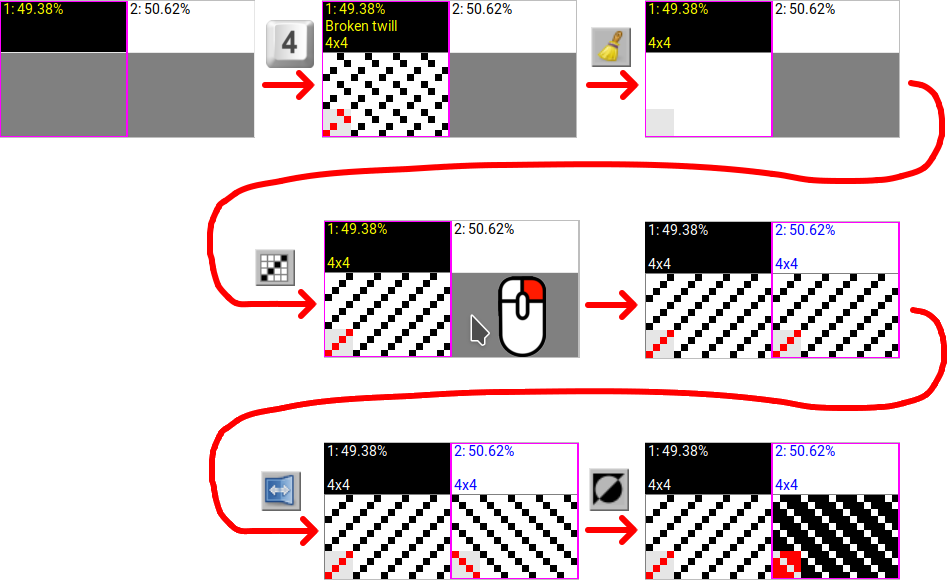
Following diagram shows how you do both weaves by using keyboard shortcut for 4 by 4 weave, then four different tools from the toolbox in the bottom right corner and copy/paste with a single right-click. We think this procedure is faster than saving each individual weave and then loading them into Jacquard conversion.
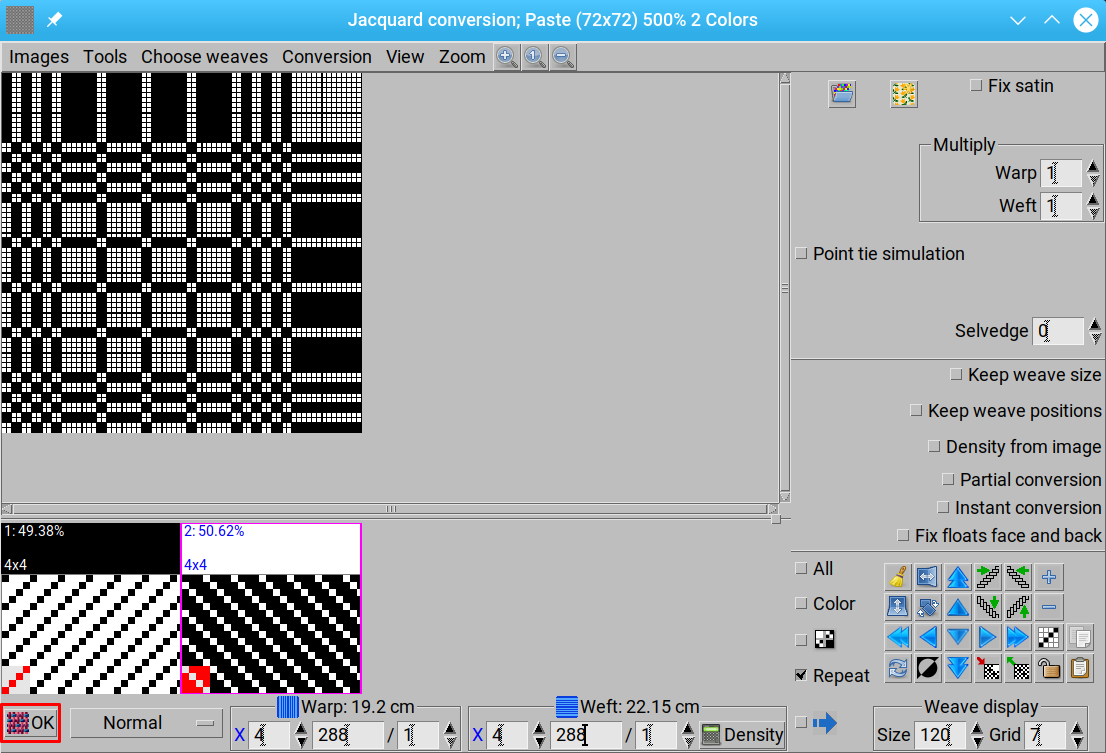
Now you are ready to click the OK button to generate the jacquard weave out of the image and weaves in the Jacquard conversion window.
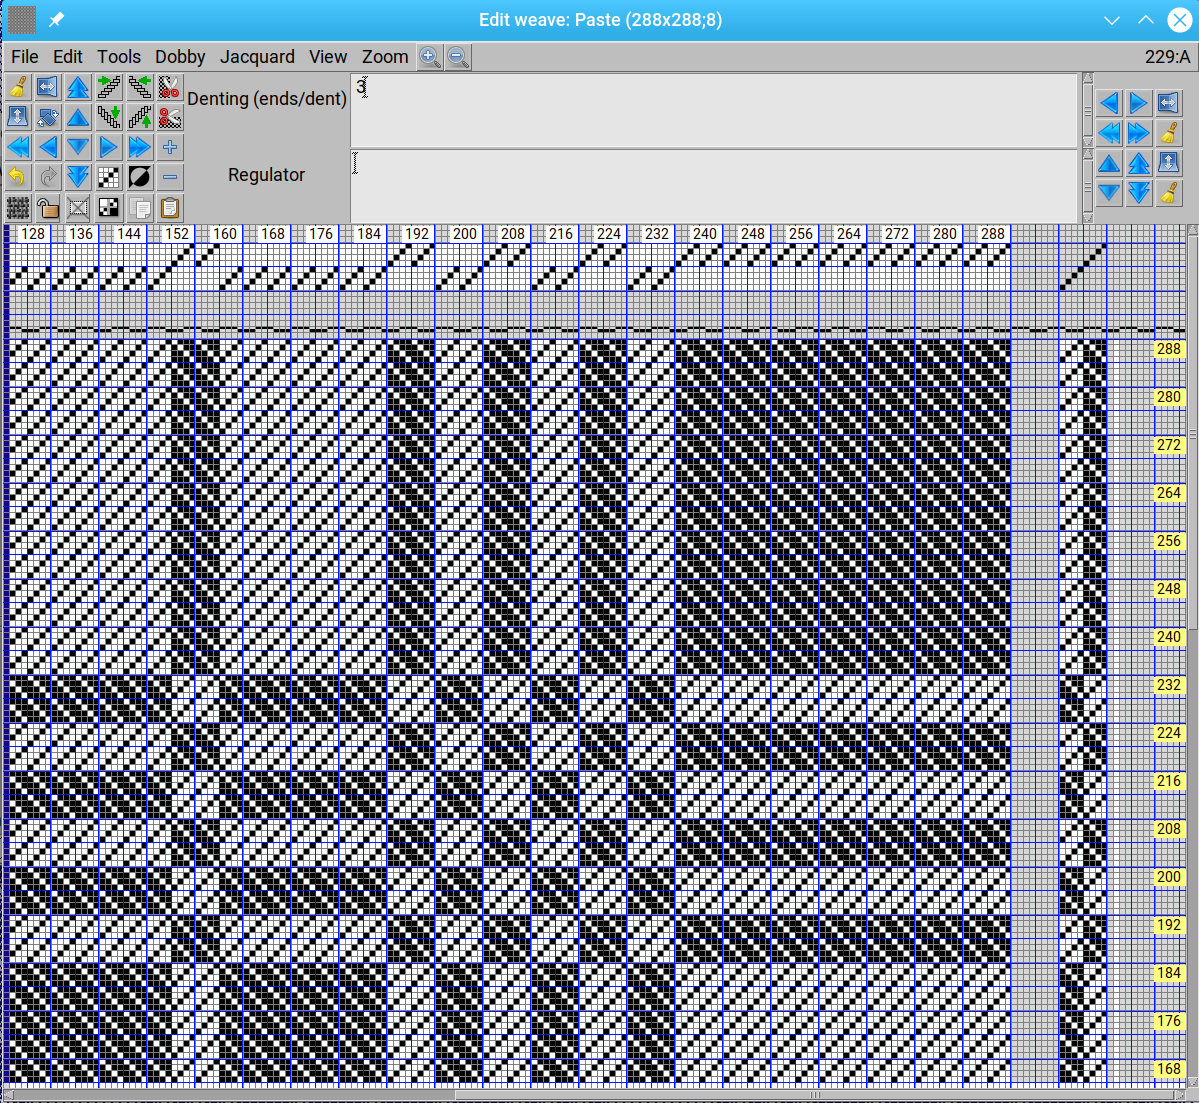
The weave replaces the content of the weave editor and the fabric in the main window will also be recalculated using this weave. Note that there is no big difference between jacquard and dobby weave in ArahWeave. If a weave uses less than 99 shafts, you also see the card and draft in the weave editor, otherwise this information is hidden.
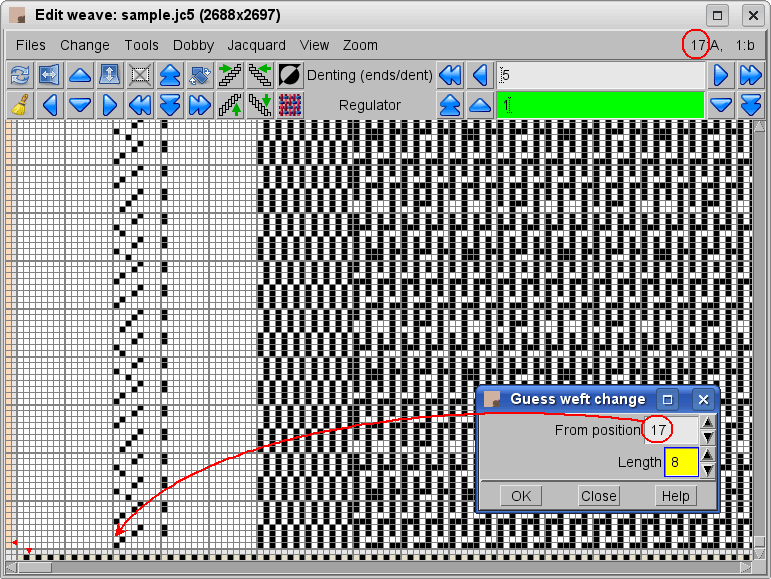
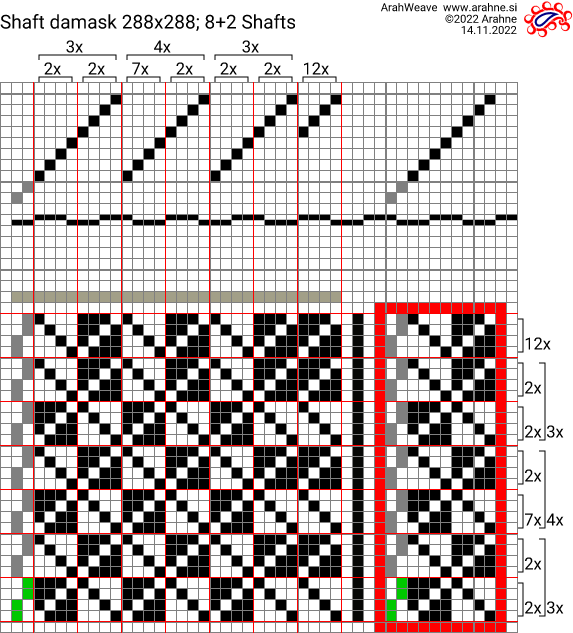
Since we do not plan to weave this fabric on a jacquard, go to the weave editor and choose Dobby > Check weave > Optimize the number of shafts.

The program draws the draft with the smallest possible number of shafts. In this case, we only need 8 shafts.
Now when we have the weave, we have to edit other fabric’s parameters.
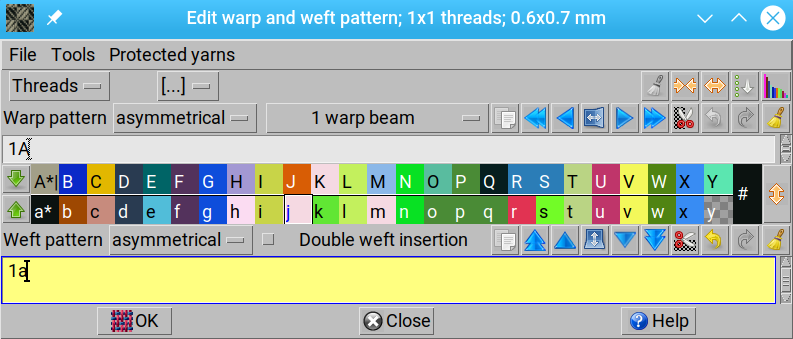
The thread pattern is a simple one as there is only one color in the warp and another color in the weft, so the pattern should be just 1A and 1a. (To open Edit warp and weft pattern window choose Fabric > Thread Pattern.)
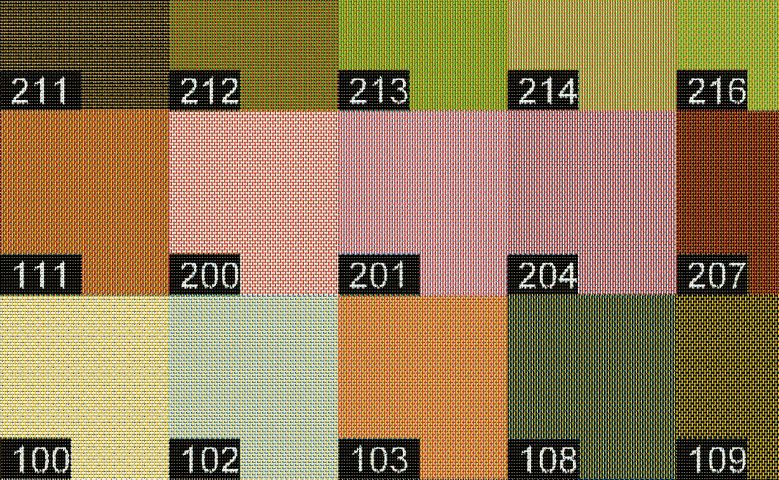
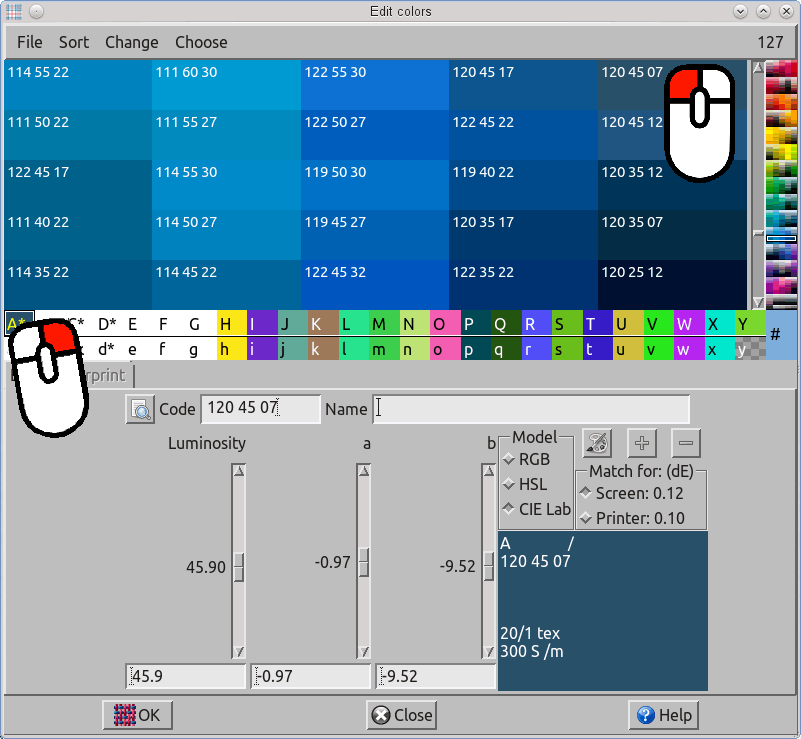
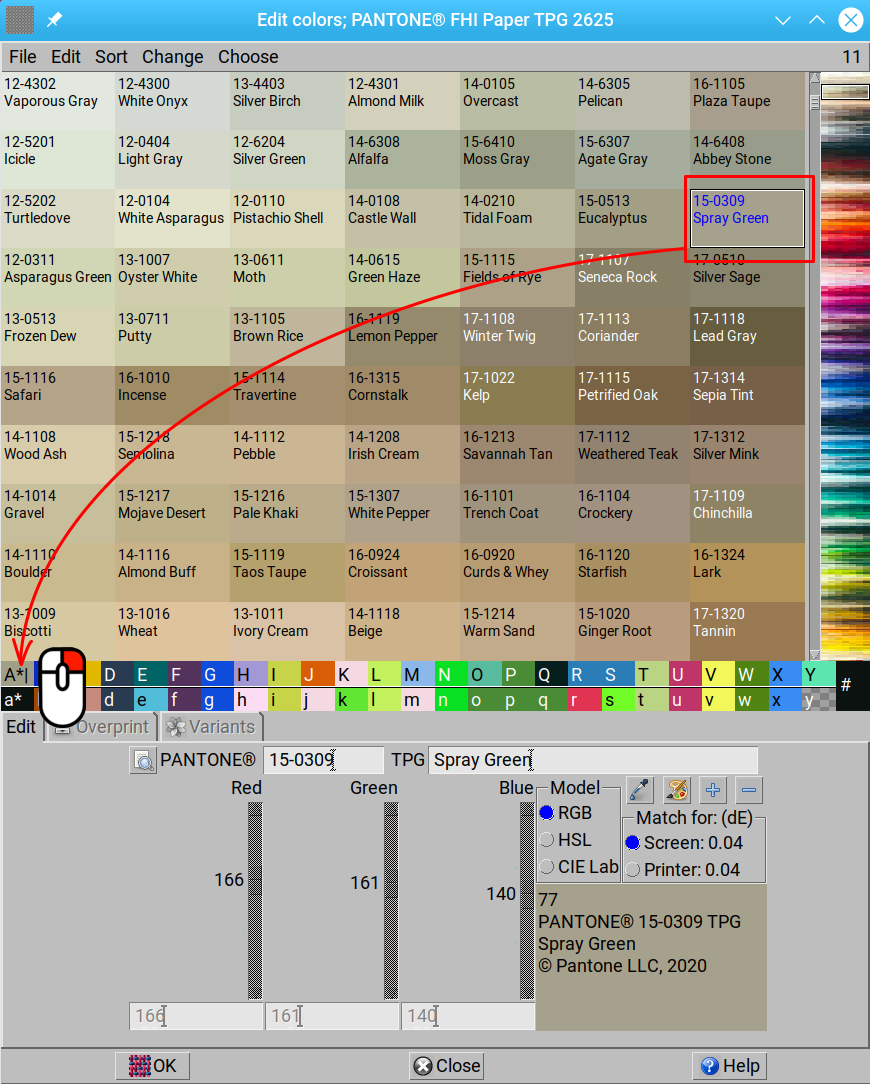
Then you need to set the colors of used threads. Choose Fabric > Colors to open the Edit colors window. We will use colors from PANTONE Textile Color System®. Browse the color chart and find the most suitable color. Copy it to the yarn bar with the right mouse button.
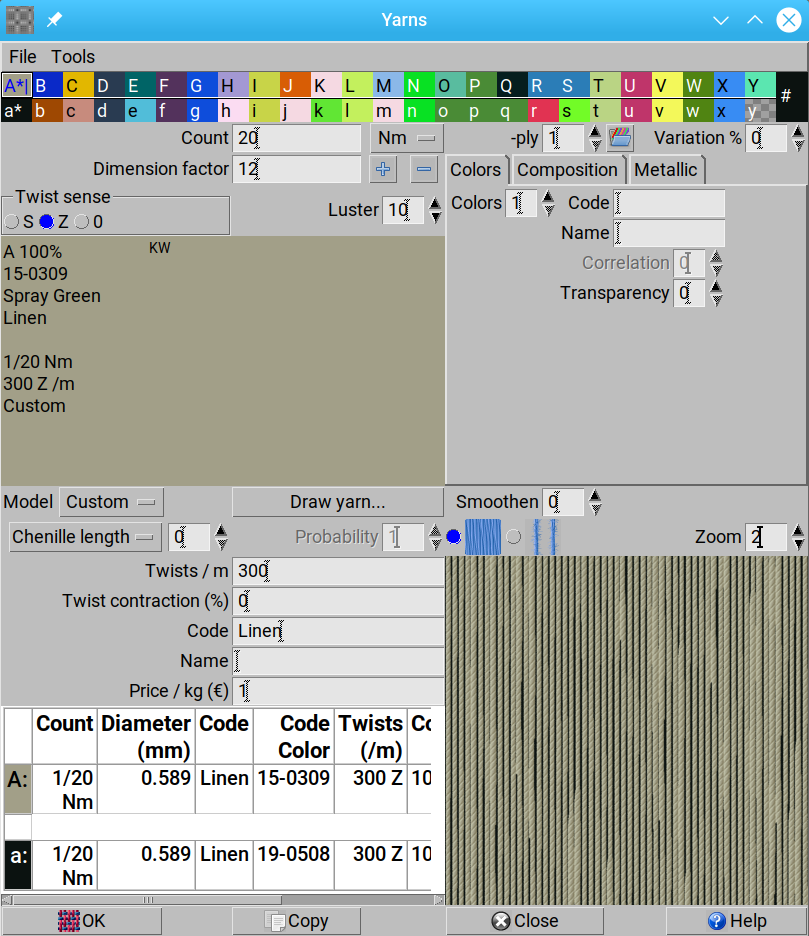
Then select Fabric > Yarns to set yarn count and twists per meter in the yarn editor. First you must use the mouse to select the yarn which you will edit, for example A, and enter the values, followed by Enter. You can copy the yarn properties to the a weft with the right mouse button; color will not be copied.
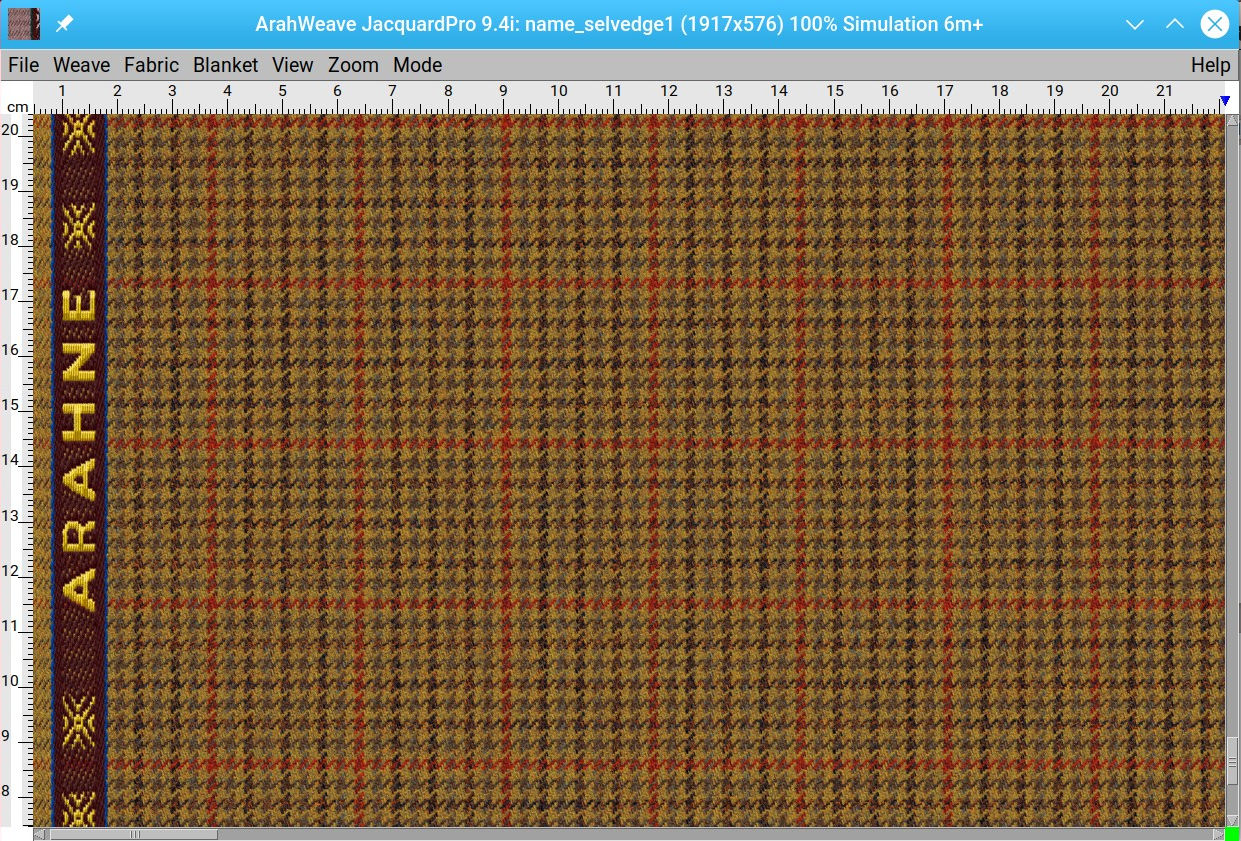
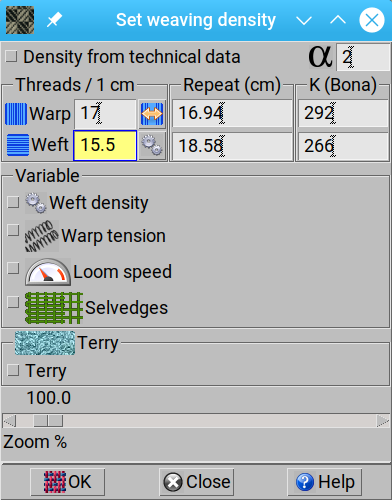
Now set the density in Fabric > Density. You can easily count the number of ends and picks per centimeter in the sample, if you magnify the scanned fabric. The density is 17 ends/cm and 15.5 picks/cm.
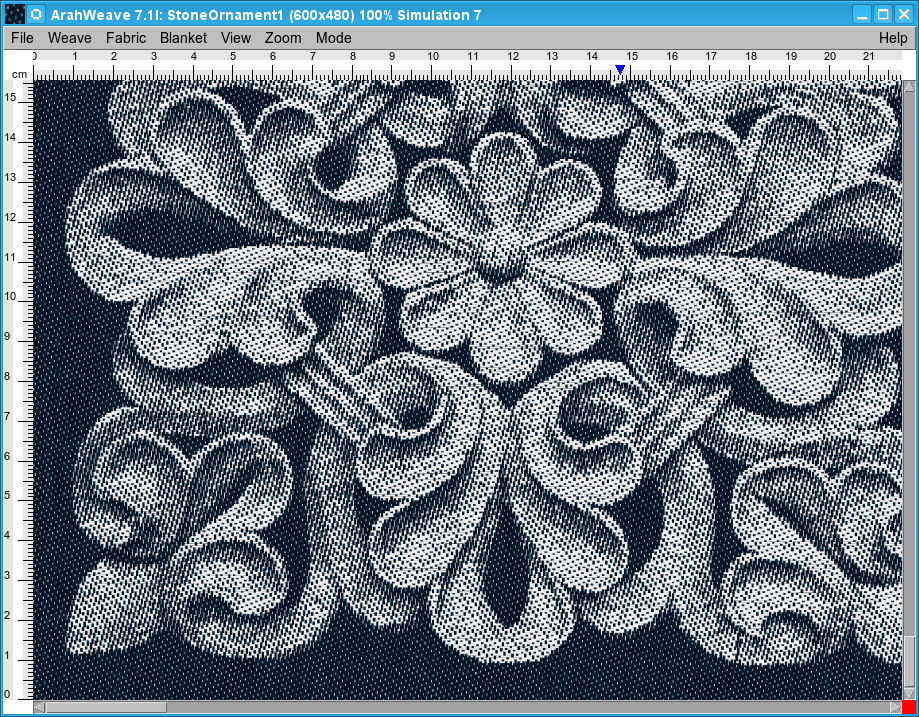
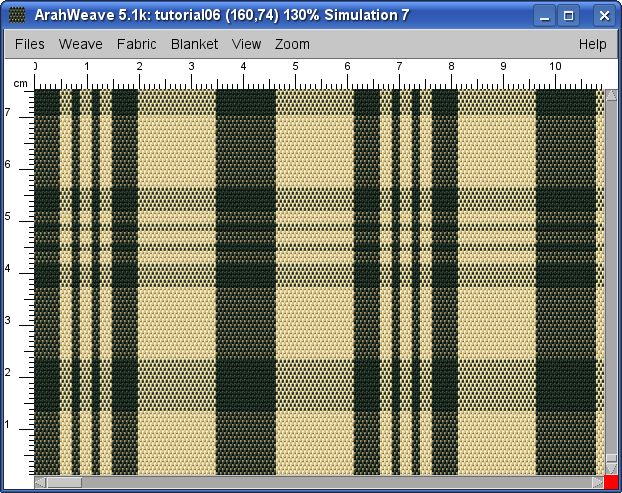
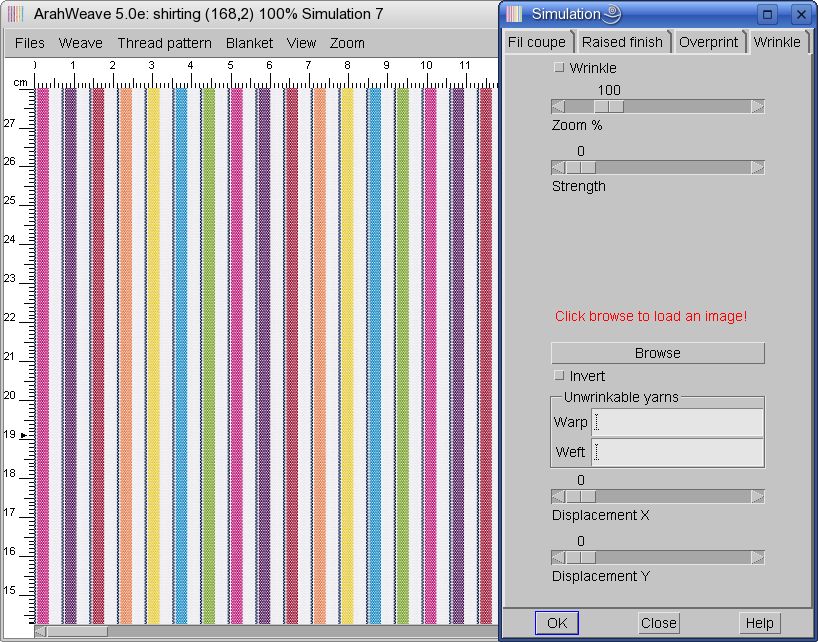
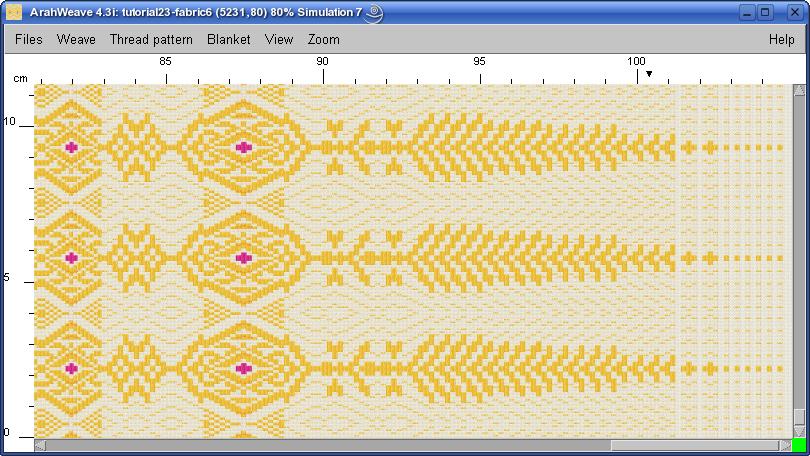
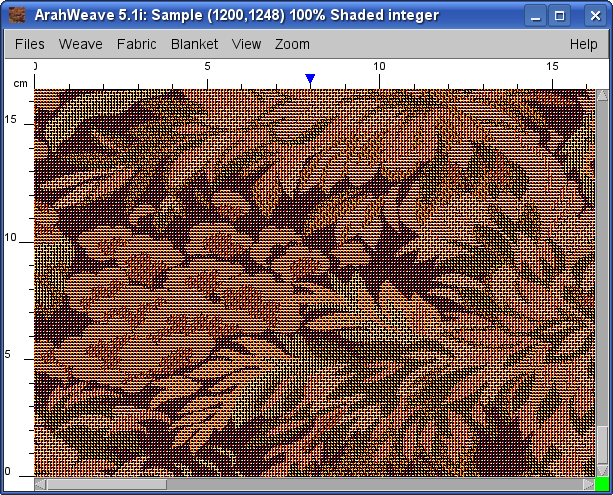
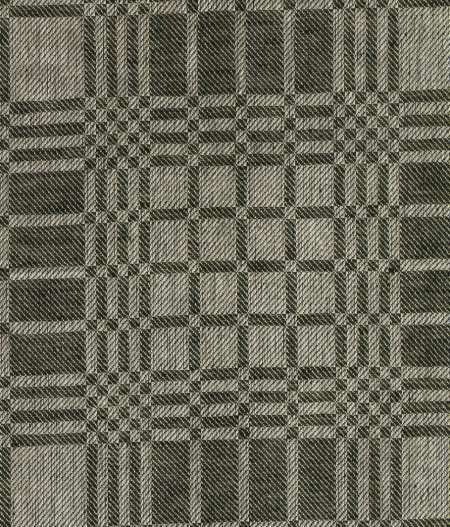
To get a simulation of fabric on a screen, select View > Simulation (9 levels, each next is better, but also slower). You can zoom in or zoom out from the Zoom menu, or by pressing + and – on the keyboard, or using Ctrl and mouse wheel, or by Zoom in ![]() and Zoom out
and Zoom out ![]() . The current zoom factor is displayed on the top of the main window.
. The current zoom factor is displayed on the top of the main window.
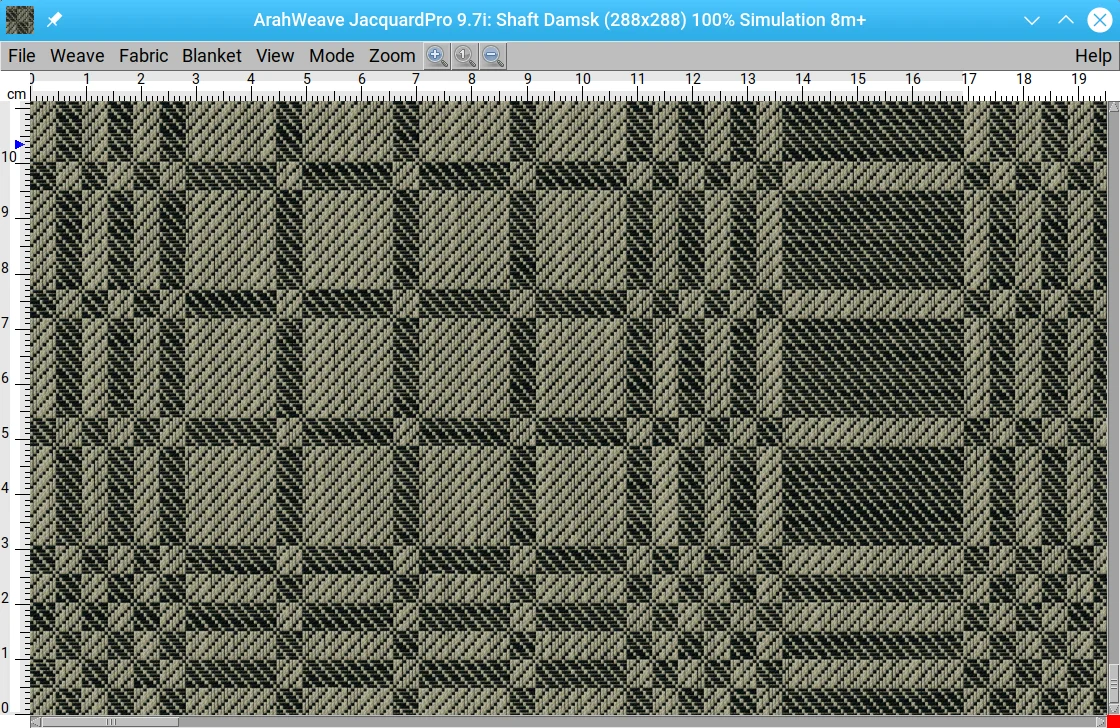
We got pretty close to the original, didn’t we?
If you need for some reason to print that weave – it is too big to fit the A4 or letter paper size. But ArahWeave has a special weave compression printout function, which detects repeats in the weave and prints a smaller weave with indication of repeats.
If you have a very big printer, and the cost of ink and paper are not important to you, you are of course free to print out the weave at its full size 😉
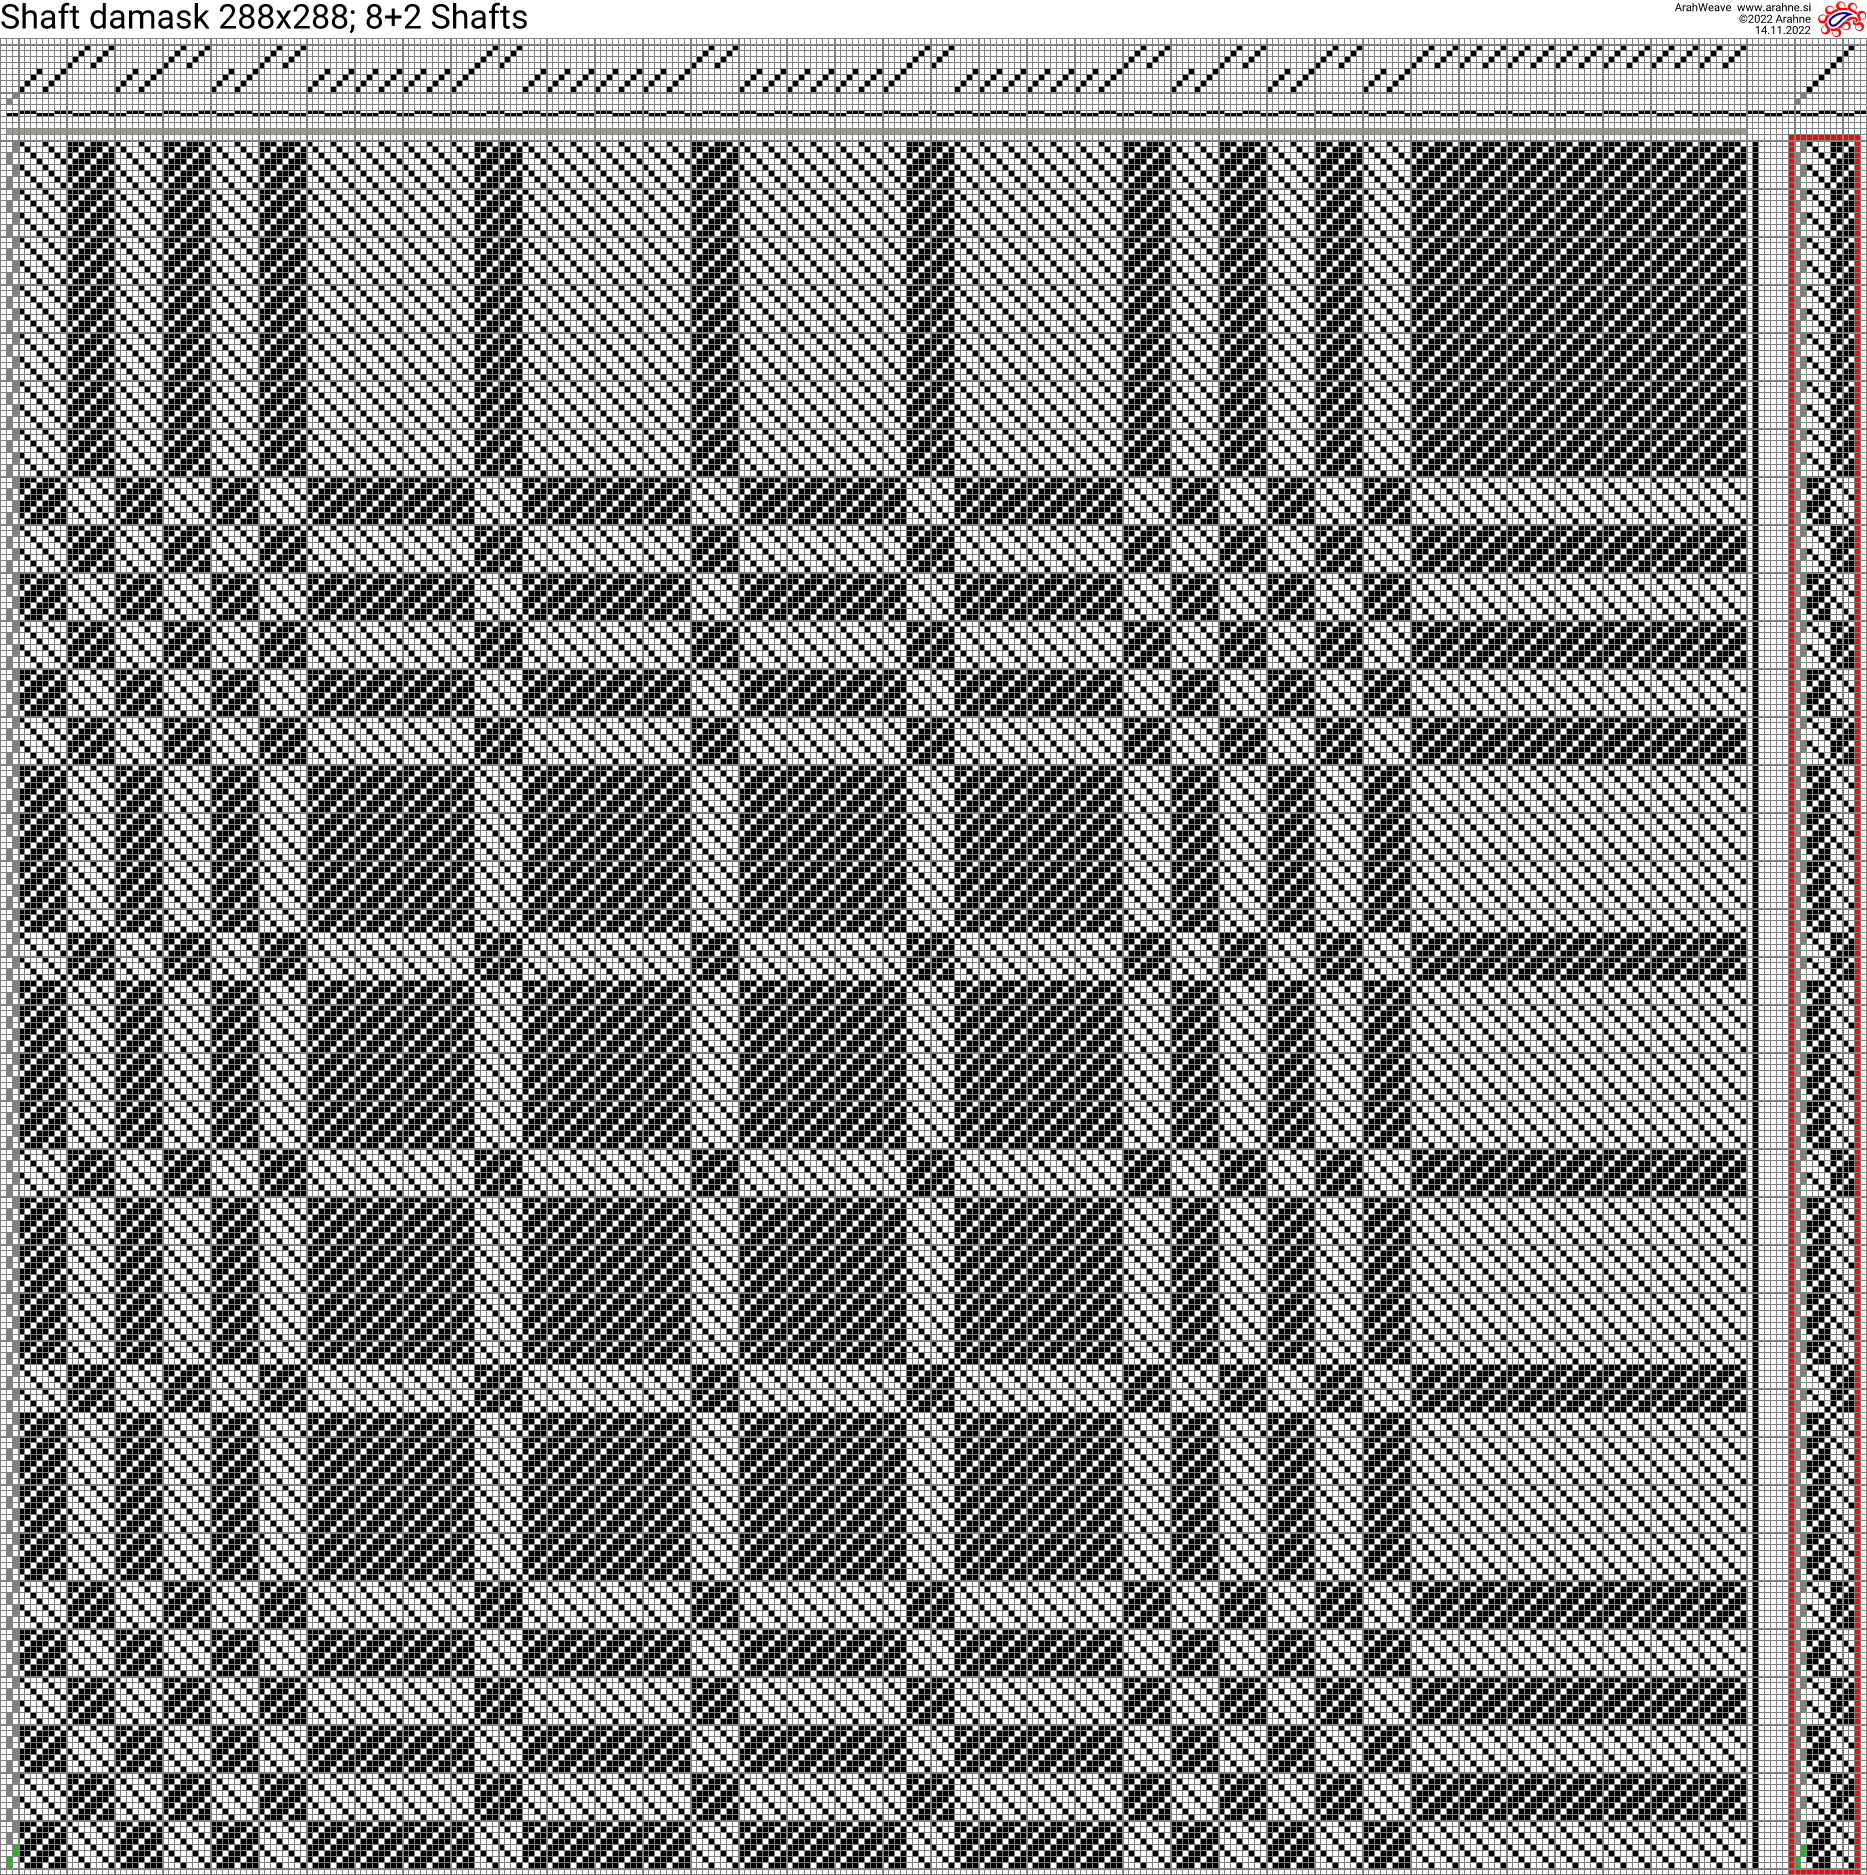
If you have electronic dobbies on your loom, you do not need to print out the weave at all, since you can transfer the weave directly from ArahWeave to the dobby over the network, USB memory stick or a smart card and appropriate reader/writer device. But the weave printout is still useful for documentation purposes. For some customers, we have put their weave “printout” pictures on line on a web server, so their weave database is available to anyone within the company at all times.