

![]()

TUTORIALS
Taking the mistery out of gobelin fabrics
During training, we are often faced with the following situation: while we are still trying to explain some basic features of ArahWeave software for weaving, the customer brings up one of the most complicated fabrics he/she has ever tried (and failed) to reproduce, and suggests we develop that one. Sometimes we give in, trying to prove that such fabrics can also be developed using ArahWeave software. As a result, valuable time is lost and customer ends up being confused with a lot of information, which was not presented in an orderly manner.
We must stress once again: Fabric design is a serious business, and can not be learned in a couple of days. It is possible to learn how to use ArahWeave in a couple of days, but not if you are novice in both weaving and computers. Anyone, who is trying to sell you a CAD, and claims that you can learn it in one day, is either lying, or does not know what he/she is talking about. Or the CAD in question is really so basic, that you can exhaust its capabilities in one day.
ArahWeave enables development of many different kinds of fabrics, and in this tutorial we present a complex gobelin fabric, so customers will be able to look it up and learn it on their own. A good explanation of gobelin construction in textile books is very rare. We are basing the example fabric for this tutorial on section 21.3 of the book Intrecci e strutture dei tessuti, written by Fernando Scanzio and Ugo Pedrazzo, published by Paravia – Texilia, Biella, Italy in 1988, pages 489-494. If you know Italian, we highly recommend this book. If you do not, we recommend that you learn it. You will be able to understand what they sing in the opera 😉
Jokes aside – It is a very good learning strategy to take a textile schoolbook and study it with the CAD, inserting the weaves and fabrics as you read the book.
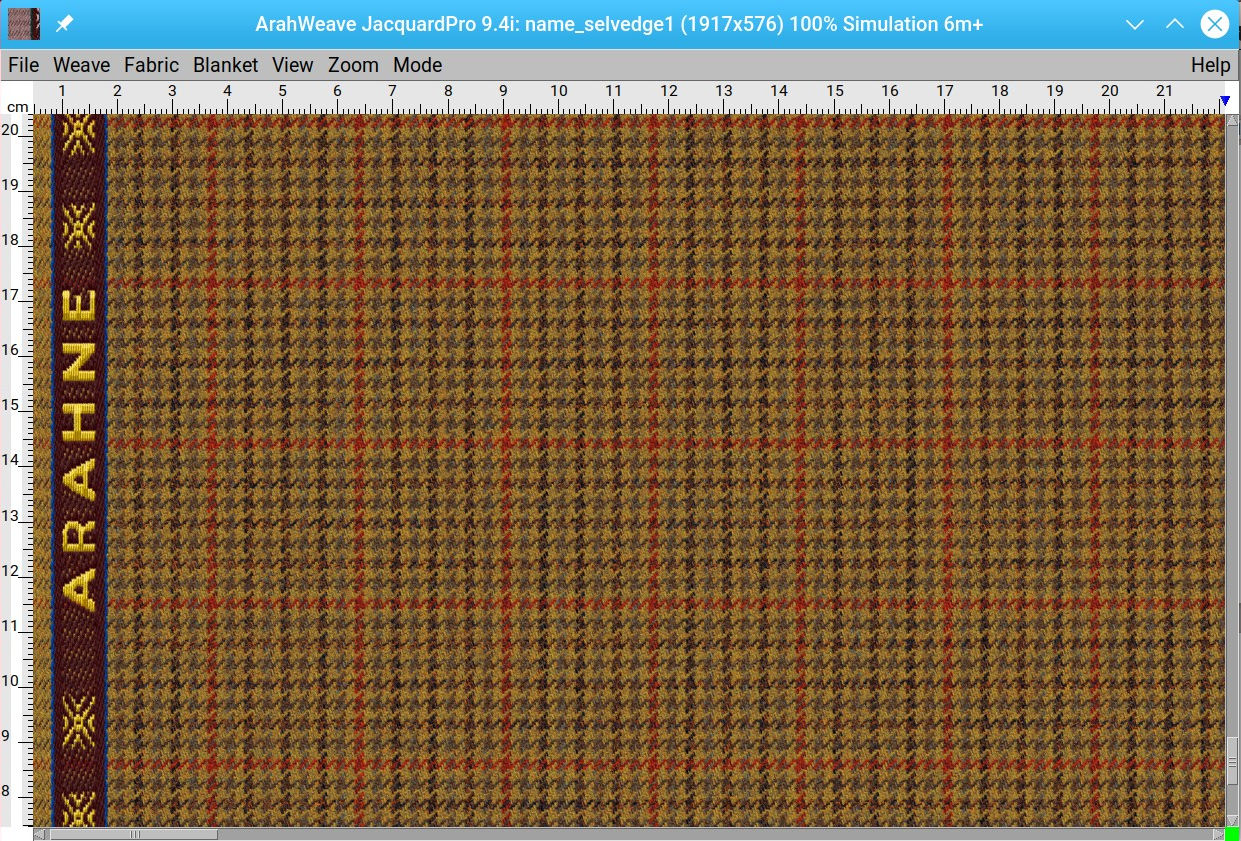
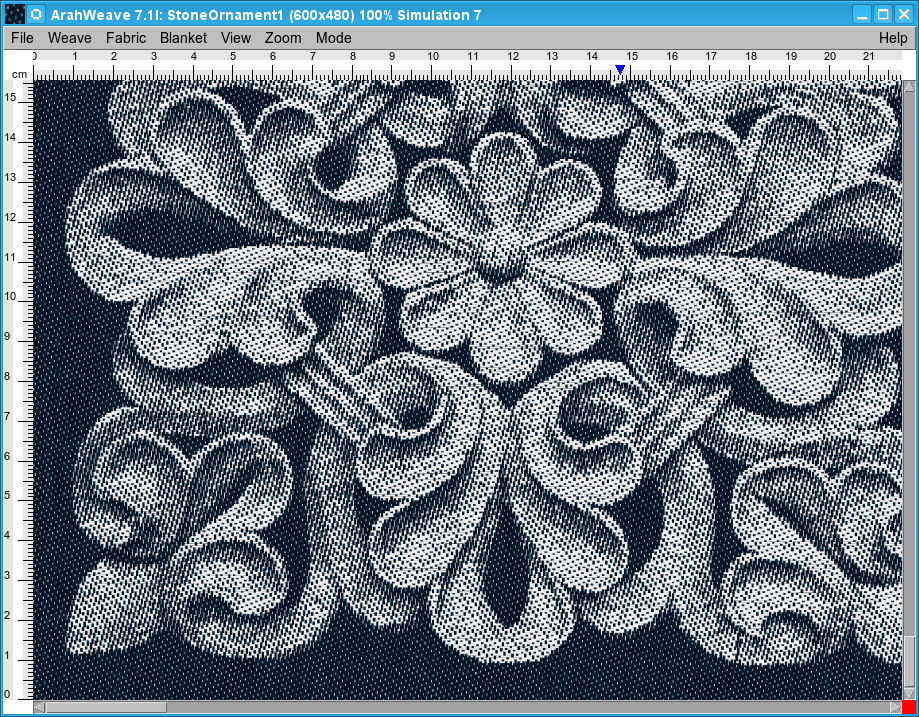
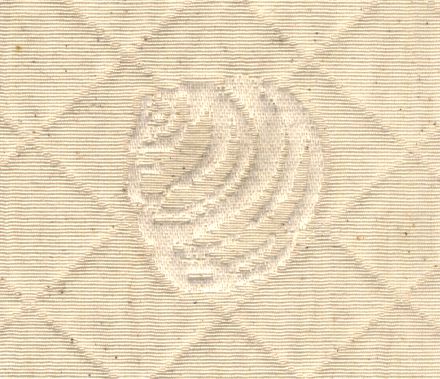
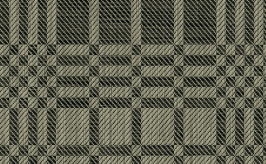
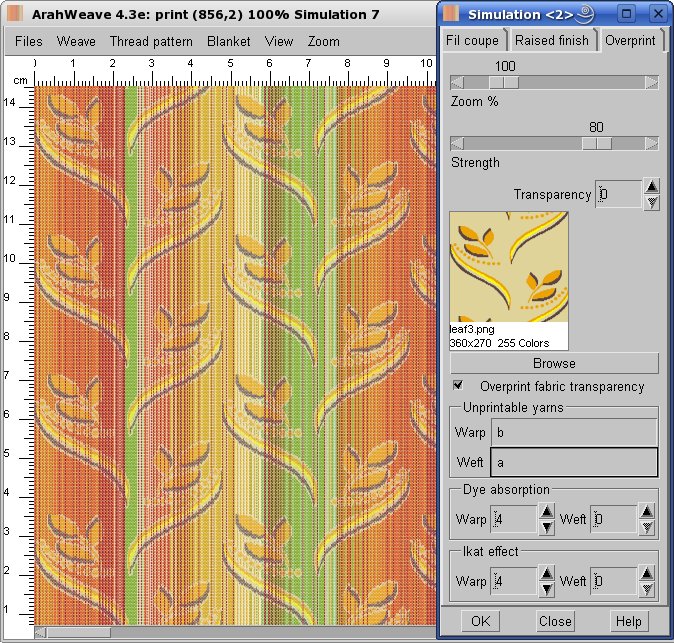
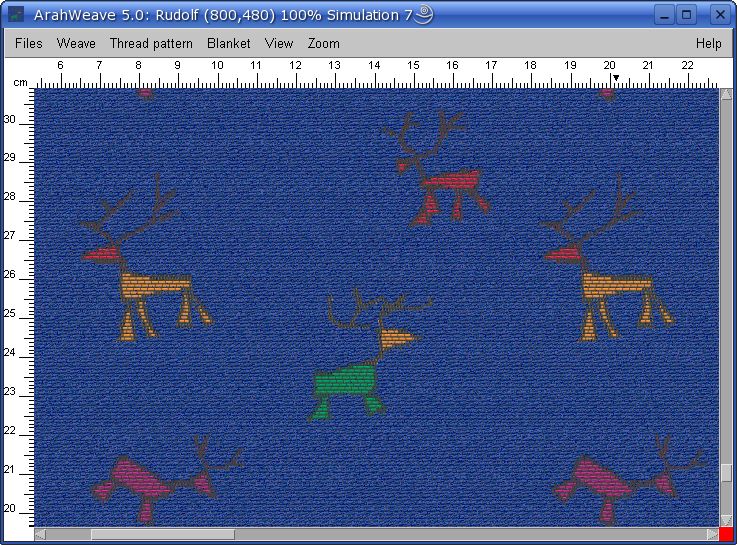
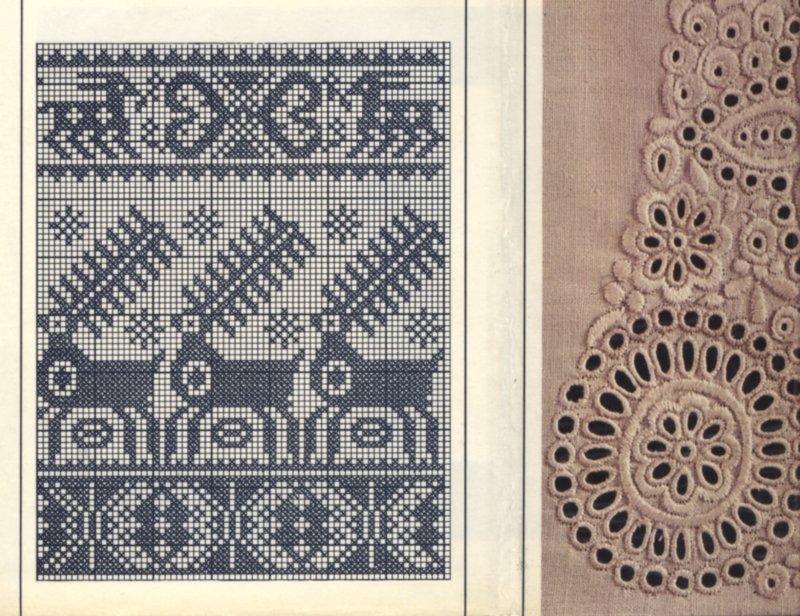
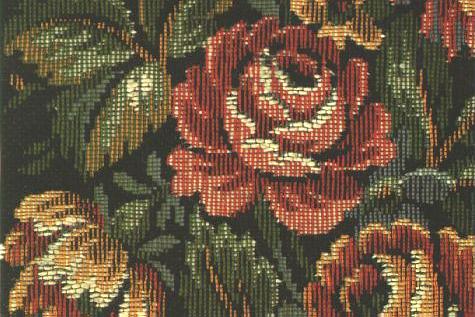
First, take a look at the scanned fabric picture. This fabric is constructed of five warp threads (one binding thread and four color effect threads) and three weft threads (one binding thread and two effect threads). Color threads are used to make a desired color effect in the fabric, while binding threads are just used to keep the other threads in place, and to make a compact, durable fabric.
Colorful warp ends, which create effects on the fabric surface, are usually wound on the first beam. Binding warp end is usually black, white or neutral gray; it is also thinner than effect threads. It is wound on the second warp beam, using higher tension than other warp ends. You need two warp beams, since warp consumption of binding threads is lower, and we keep it at higher tension. In some cases, two binding warp threads are used.
Weft is usually thicker than warp, so that we can weave faster with lower weft density. Binding weft is an exception, since it is similar to binding warp, that is: thinner and of achromatic color. A filament yarn is often used for binding threads, since it can be semitransparent and thus even less visible. Not to mention the lower yarn price with respect to cotton or wool.
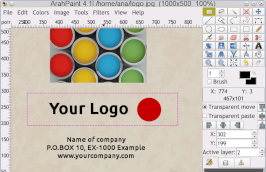
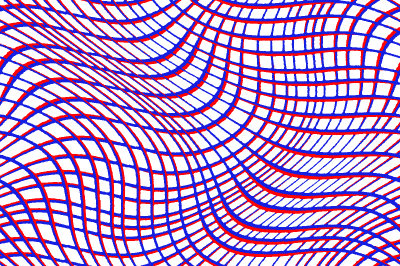
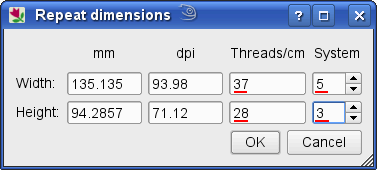
You need to have a jacquard image in proper dimensions with respect to weaving density. You also need to consider that the image size will be multiplied by the number of warp threads (five) and weft threads (three). So you draw a smaller image. We have already described how to draw the jacquard image with ArahPaint in this tutorial. We want to remind you of a special feature in ArahPaint: namely, in ArahPaint you can enter the density of finished fabric with Edit > Set repeat size…, and the Zoom window will display the image in aspect ratio of the finished fabric. Drawing is much easier, if you use this setting..
The color areas of a gobelin image are usually quite small, and this makes the image similar to a cross-stitch or knitting pattern. Since each point is going to be multiplied by 5 in horizontal and by 3 in vertical, it is quite acceptable to have areas of single pixel on this image. In normal damask type of fabric, it would not be a good idea to have such small areas, because we would not multiply the image size during weave insertion, and the areas would be too small for the weave to make a difference. It would be like writing a poem with single character words. But jacquard is similar to art: for every rule, there is a special case, when you need to break it.
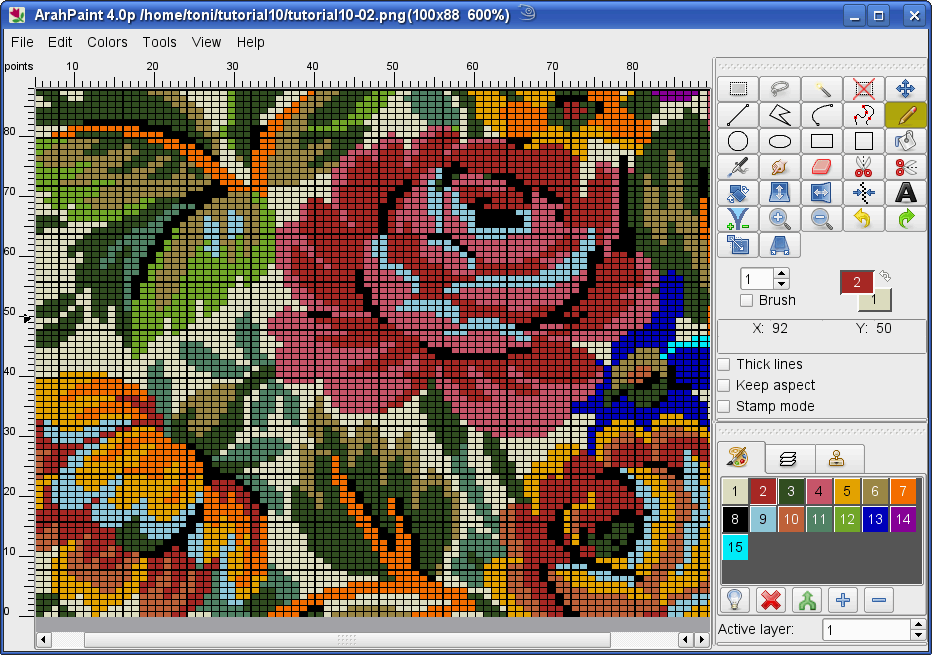
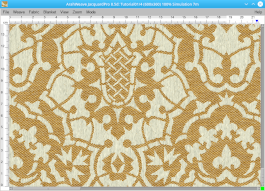
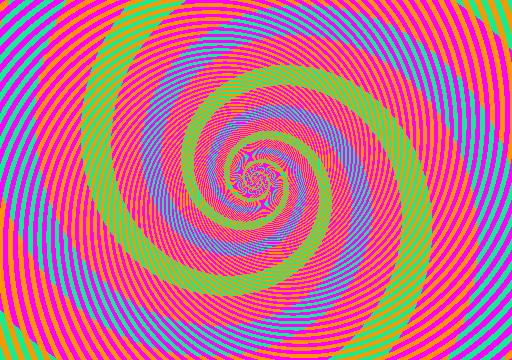
Here is the picture  , so that you do not need to redraw it, if you just want to repeat the exercise. It is not drawn in full repeat – you should be able to finish it on your own, if you want to become a jacquard designer. For gifted people, this is the easy part. For the rest of us, it is next to impossible 😉
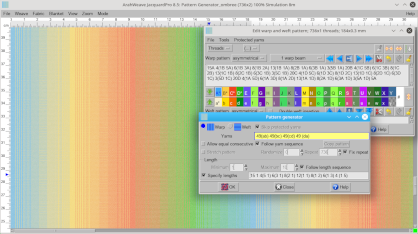
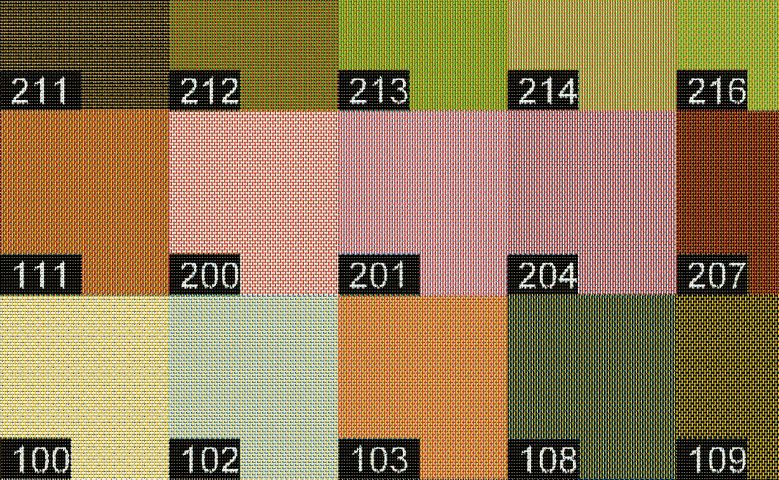
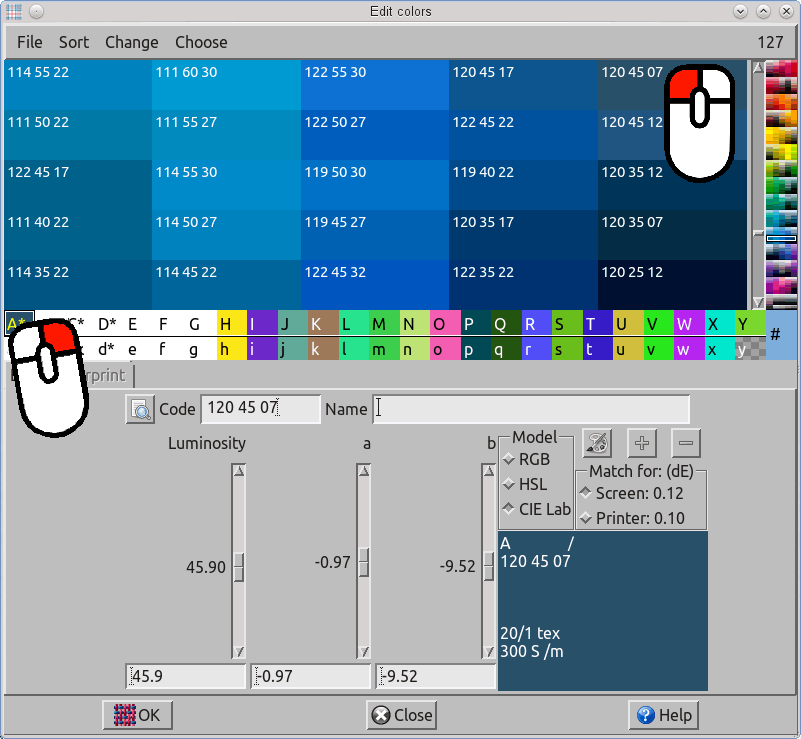
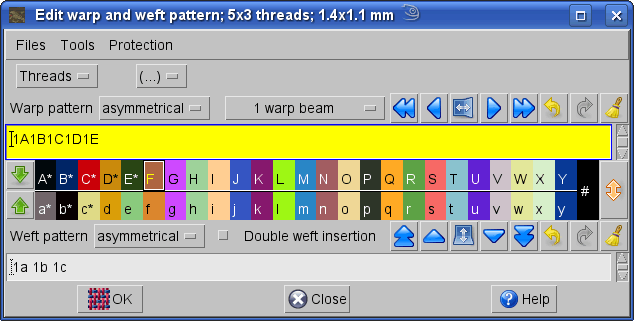
Since we have five warps and three wefts in this fabric, we can start by setting the warp and weft pattern. Open ArahWeave and choose Fabric > Thread pattern. Type 1a1b1c1d1e for warp and 1a1b1c for weft. You should also set warp and weft colors as following: warp – black (thin), blue, red, orange, green; weft – gray (thin), black, white. Detailed setting of colors and yarns was already explained in this tutorial.
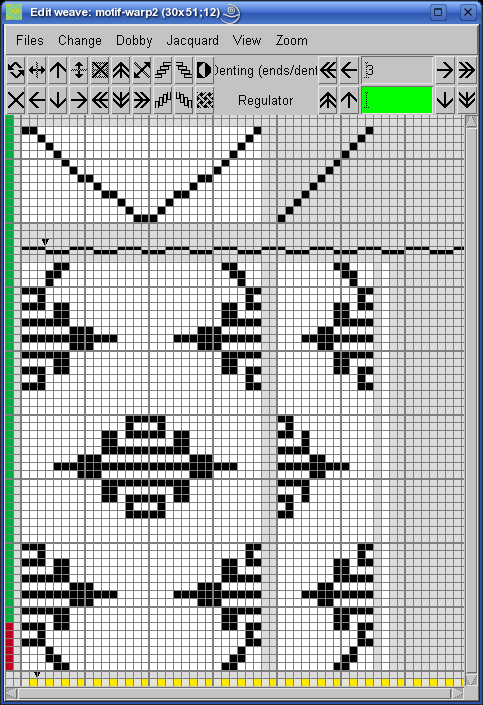
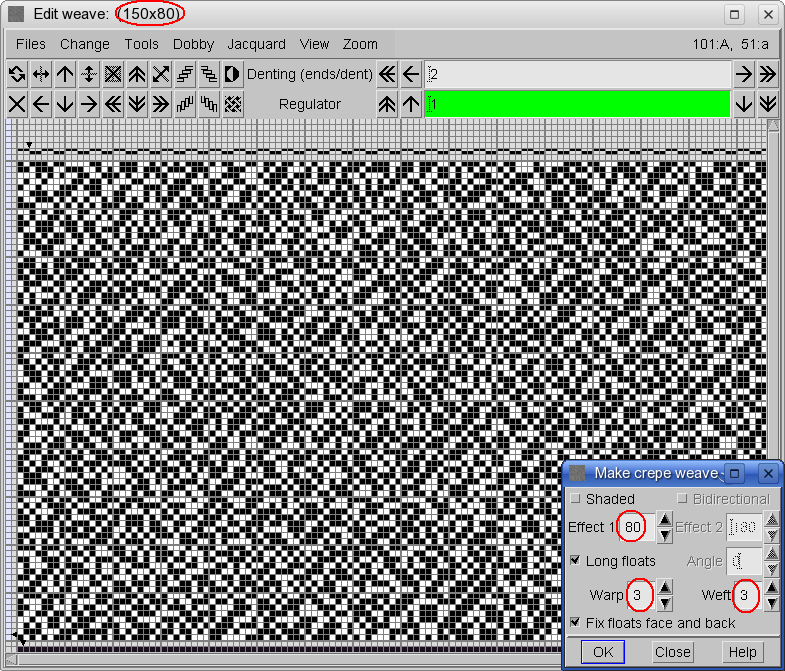
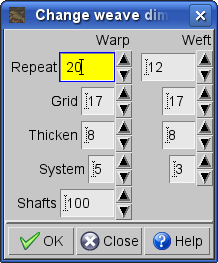
We are now at the stage when we need to draw the weaves for gobelin fabric. Select Weave > Edit. In Edit weave toolbox click on ![]() to delete contents of the weave editor. Then you have to set the dimensions of the weave. Since our fabric is composed of five warps and three wefts, and the size of weave for one warp and one weft is four by four, the size of the composite weave is 5 warps x 4 = 20 and 3 wefts x 4 = 12. Select Change > Dimensions. In the Change dimensions dialog box write the dimensions of the weave which you will draw (20×12). You can also change dimensions with a mouse if you click on arrows or use a mouse wheel on the numbers.
to delete contents of the weave editor. Then you have to set the dimensions of the weave. Since our fabric is composed of five warps and three wefts, and the size of weave for one warp and one weft is four by four, the size of the composite weave is 5 warps x 4 = 20 and 3 wefts x 4 = 12. Select Change > Dimensions. In the Change dimensions dialog box write the dimensions of the weave which you will draw (20×12). You can also change dimensions with a mouse if you click on arrows or use a mouse wheel on the numbers.
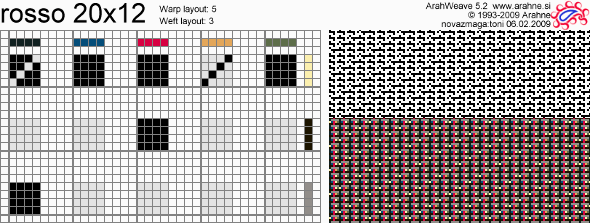
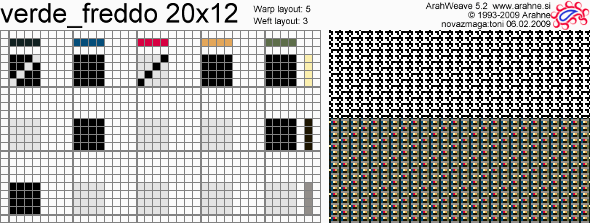
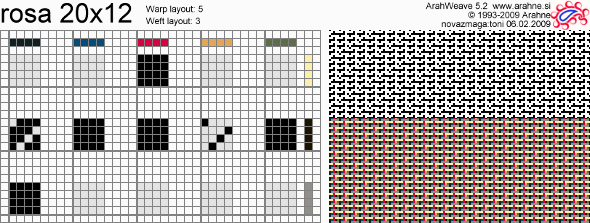
We are using fifteen different weaves (color effects) in this fabric. Weave combinations between individual warp and weft threads for each color in jacquard design are shown in the table below. Black warp and gray weft are binding threads. At the bottom of the table, there is also a weave profile for each weave, so you can compare the table and profile, while trying to figure out the logic behind the weaves. The profile is vertical, and the top of the fabric is on the right hand side.
Yes, the table looks intimidating. But it is really not that complicated. For starters, it is good to examine the profile. Let us look at the first weave (rosa). We have thick white weft on top, and thick black weft on the back. The thin gray binding weft is always in the middle, and it ties the red effect warp to the top, in conjunction with thin black warp. The green and blue warps are in the middle, doing nothing, and the yellow warp is tied with black weft to the back face. The construction of the first 12 weaves is all basically equal, just the positions and number of threads are changing. For example, pairs rosa-rosso, verdino-verdone, azzurro-blu, giallino-ocra, are just combination of one effect warp (red, green, blue) and alternating white with black weft, to make light and dark version of each color effect. Ocra, arancio, viola, verde and verde freddo put two effect threads on top, to make additional color combinations.
Now we examine the exceptions: Nero is again equal to others, just that there is no effect warp on top – it is a full black weft float. This weave can not be used for larger areas – it is only used as an outline. This leaves us with the two real exceptions: celeste and carta. They are white and black weft versions of plain weave with thin binding warp. Why didn’t we make other color variations in this way? Because only the combination with thin black warp enables us to use the high weft density. This is an important part of gobelin weave construction – you must think of the surface density and of space you have at disposal. For this reason, you can not put three warps on top or on the back.
The roles of threads in gobelin weaves are structurally different (effect and binding), so you can not generate additional weaves just by shifting the weave left or right, up or down, like we have suggested in this tutorial. You may shift the weave around, but you must keep the binding threads at its original positions.
| Weft | Warp | rosa | rosso | verdino | verdone | azzurro | blu | giallino | ocra | arancio | viola | verde | verde freddo |
celeste | nero | carta |
|---|---|---|---|---|---|---|---|---|---|---|---|---|---|---|---|---|
| C | Black | |||||||||||||||
| Blue | ||||||||||||||||
| Red | ||||||||||||||||
| Yellow | ||||||||||||||||
| Green | ||||||||||||||||
| B | Black | |||||||||||||||
| Blue | ||||||||||||||||
| Red | ||||||||||||||||
| Yellow | ||||||||||||||||
| Green | ||||||||||||||||
| A | Black | |||||||||||||||
| Blue | ||||||||||||||||
| Red | ||||||||||||||||
| Yellow | ||||||||||||||||
| Green | ||||||||||||||||
| Profile |  |
 |
 |
 |
 |
 |
 |
 |
 |
 |
 |
 |
 |
 |
 |
|
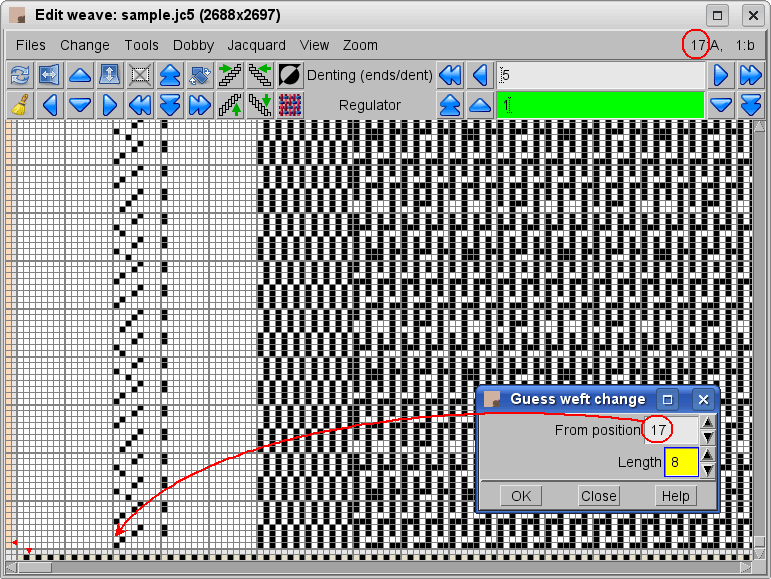
It would be quite difficult to draw a composite weave directly into the weave editor. Instead of this choose Change > Edit decomposed. Type 5 in Warp layout, and 3 in Weft layout. The weave is now divided into 15 fields, which represent weave combinations between each warp and weft. The grid of a selected field is colored red. Use the left mouse button for drawing black points (warp up), and the right mouse button to erase them. Now simply read the above table and copy elementary blocks (warp/weft twill, warp/weft up, plain weave) to its proper places. You can copy or exchange selected weave as in other part of the program: copy to another field with right mouse button, exchange with middle button. You can draw the weave points in any of the two windows – the changes will be immediately updated to all parts of the program.
Just one note on the weave profile in the weave editor – you may have noticed that it is quite different from the profile at the bottom of the weave table. The profile in the table has been drawn by hand, and usually represents the weaver’s intent, as a first step in the designing of a new weave. You see that weft threads are clearly positioned at the top, bottom or middle, according to their desired role. The profile in weave editor is generated by ArahWeave, and the program has no idea of binding thread and things like that. It just draws the profile according to the position into which threads are pushed by the weave. For reasons of clarity, each thread has its own position, so green and blue warp run one on top of the other, although they would run in parallel in the real fabric. You can also see that the gray binding weft is on the top (not in the middle), together with thick black weft. But the real fabric is also like that. So you see that the weaver’s profile from the weave table looks more understandable, but can also be deceiving.
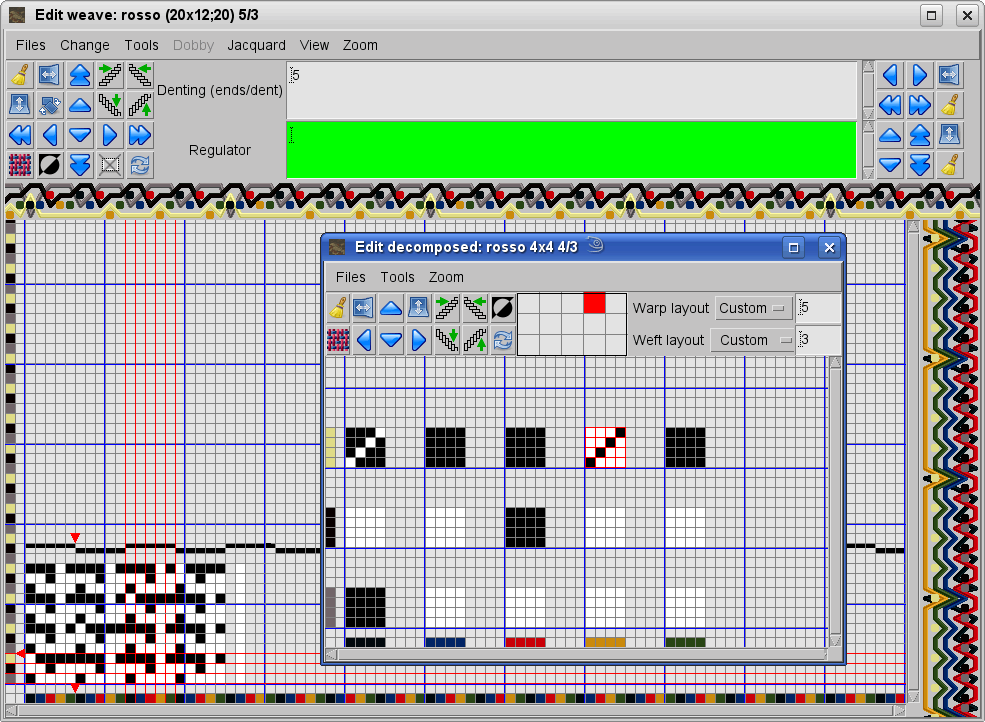
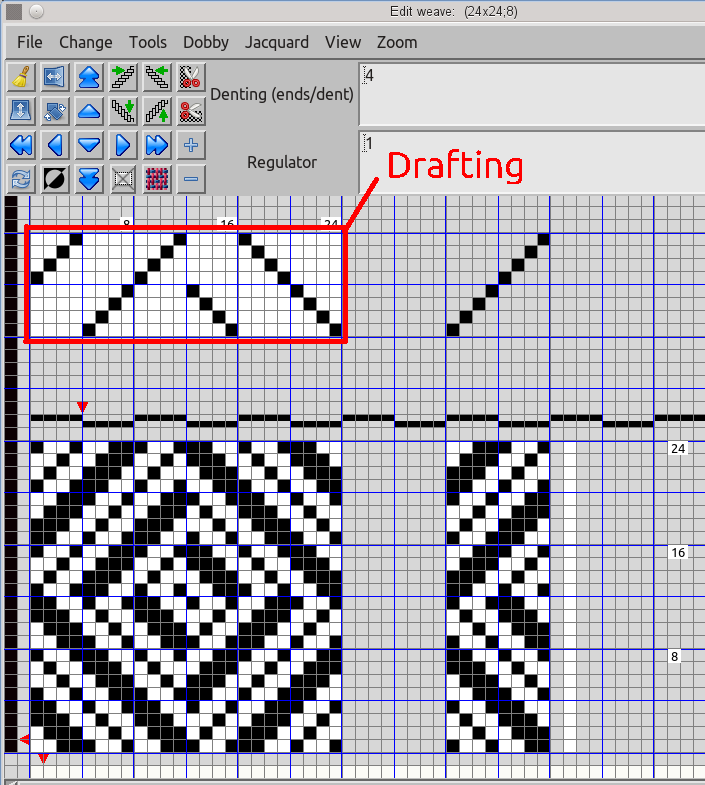
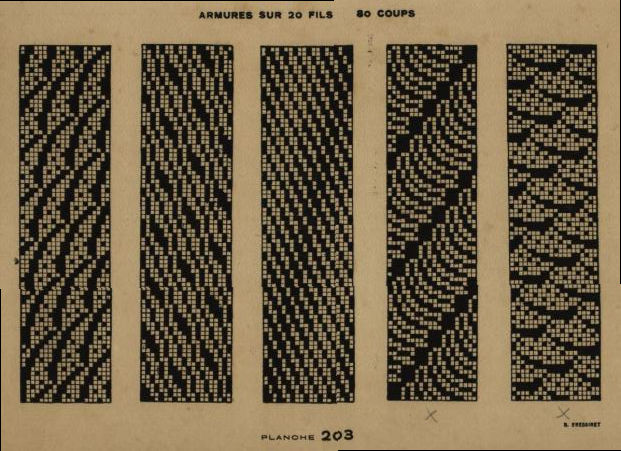
Below is a sample printout of decomposed weave. Besides the weave from the editor above, we have added two other weaves, so you can look it up in the weave table above, and check if you understand it properly. Or better still – open ArahWeave and draw them by yourself.
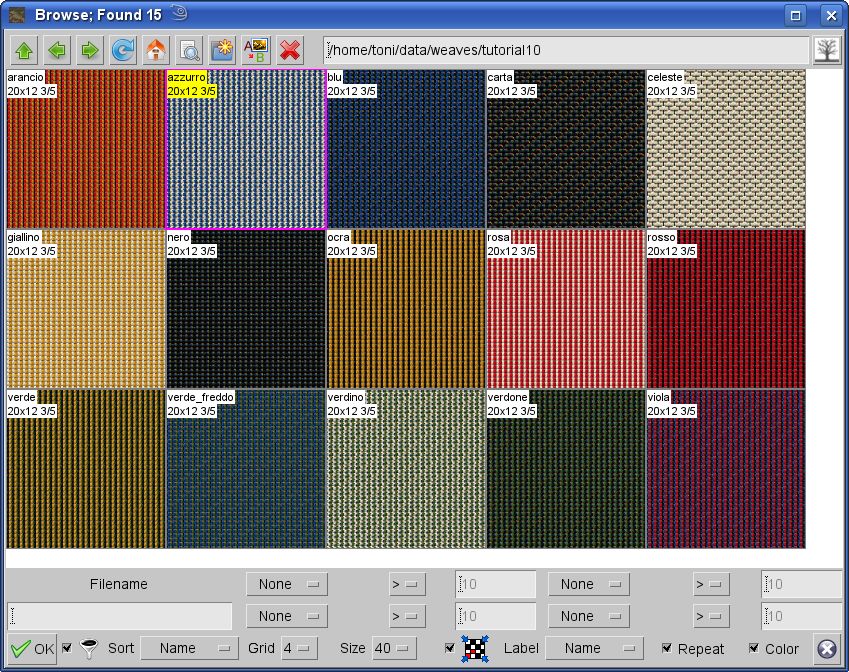
After you have drawn and saved the weaves, you can check the color effect of weaves in the browse window. You can reach it through Edit weave window be selecting Files > Browse. The Color button in the right lower corner should be on, and you should set the correct density of the fabric (Thread pattern > Density), and View of fabric should be set to Simulation 6 or higher..
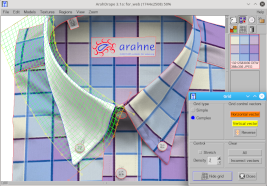
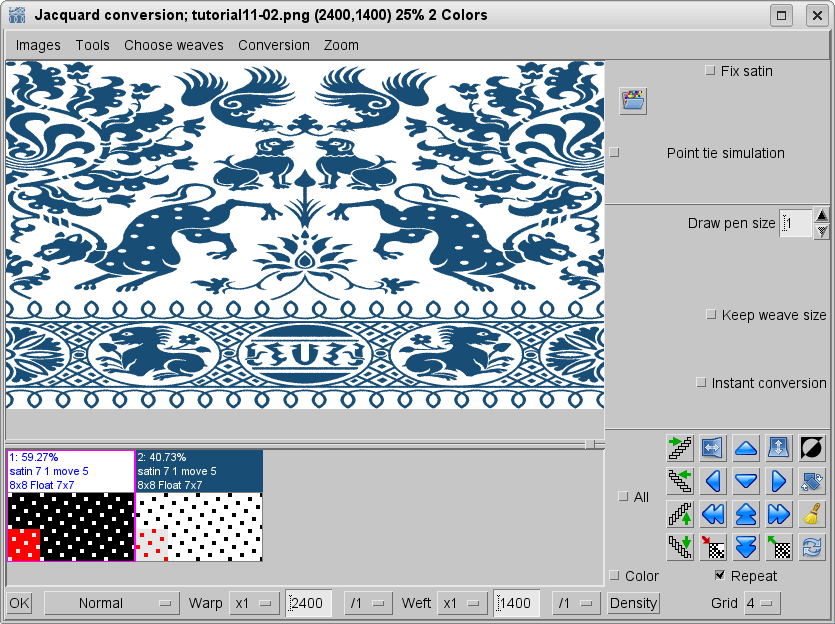
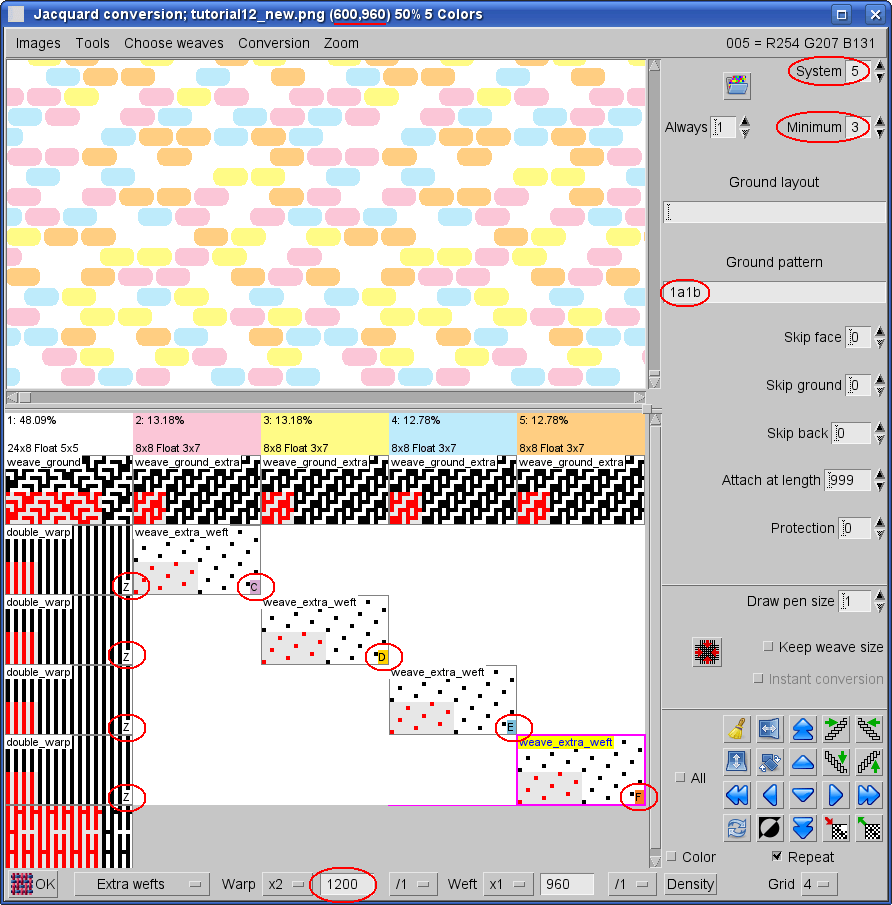
Now choose Weave > Jacquard conversion, and load the image in the Jacquard conversion window by selecting Images > Load image.
The picture size is 100 by 88 pixels. It is displayed on the title bar of the Jacquard conversion window, along with image filename, number of colors, and current zoom level. We need to to change the resulting weave size after weave insertion according to the number of warp (x5) and weft (x3) threads. Enter the multiplied values at the bottom of the Jacquard conversion window for warp (5×100=500) and for weft (3×88=264) or just simply click on x5 for warp and x3 for weft.
Now we need to load a jacquard weave for every color in the image (Choose weaves > Load weave…). You can select weaves from the file selection box. In this case it is even better to use the Browse window (Choose weaves > Browse).
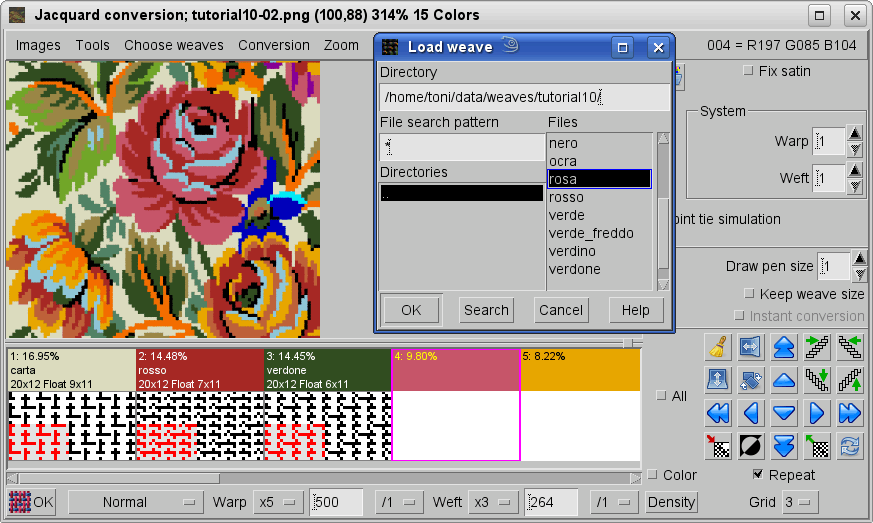
If you press the Color toggle button in this window, you can also see the weave simulation of the weave which you have chosen for each color, even before you apply the weaves to the image. Isn’t that cool?
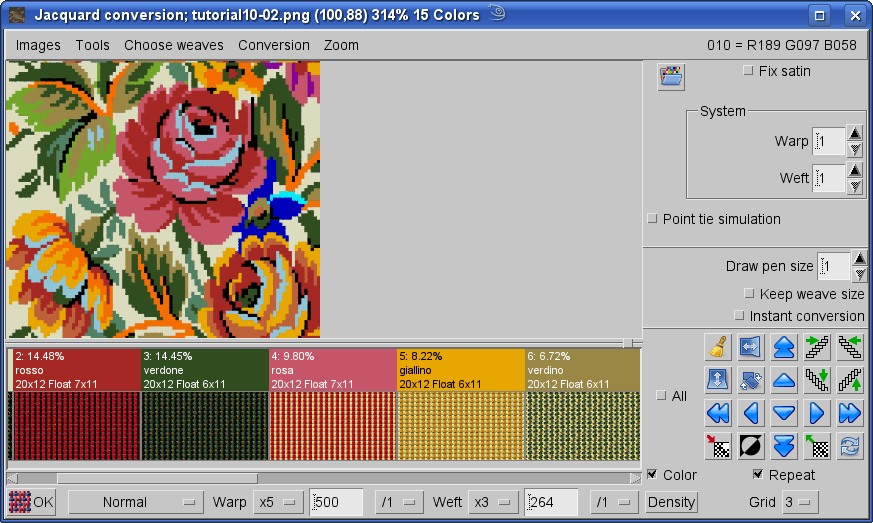
By pressing the OK button in the left lower corner, you will get the jacquard weave based on color image and weave selection.

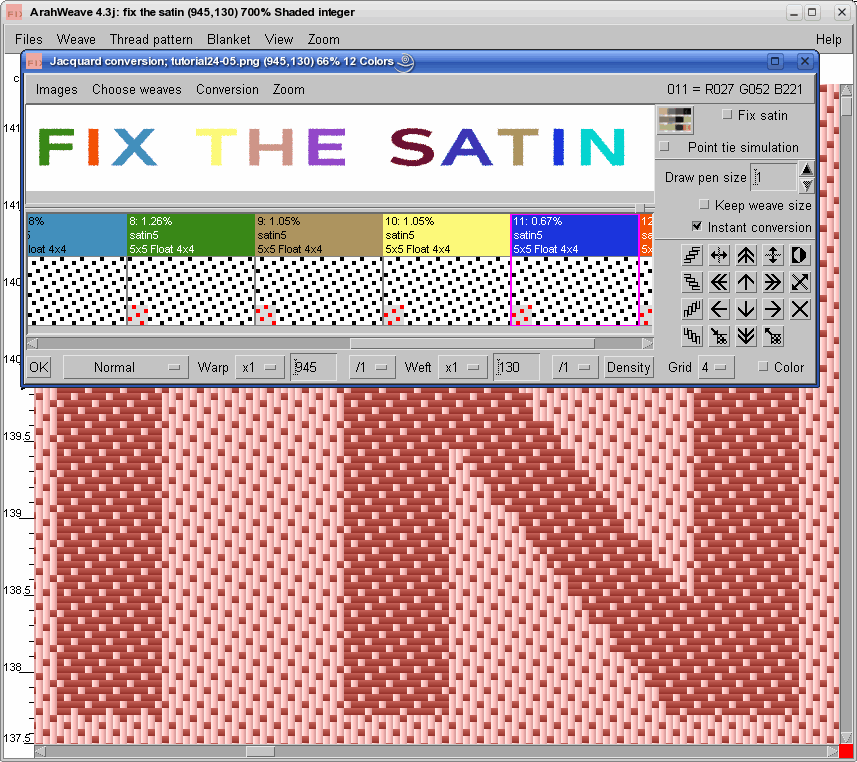
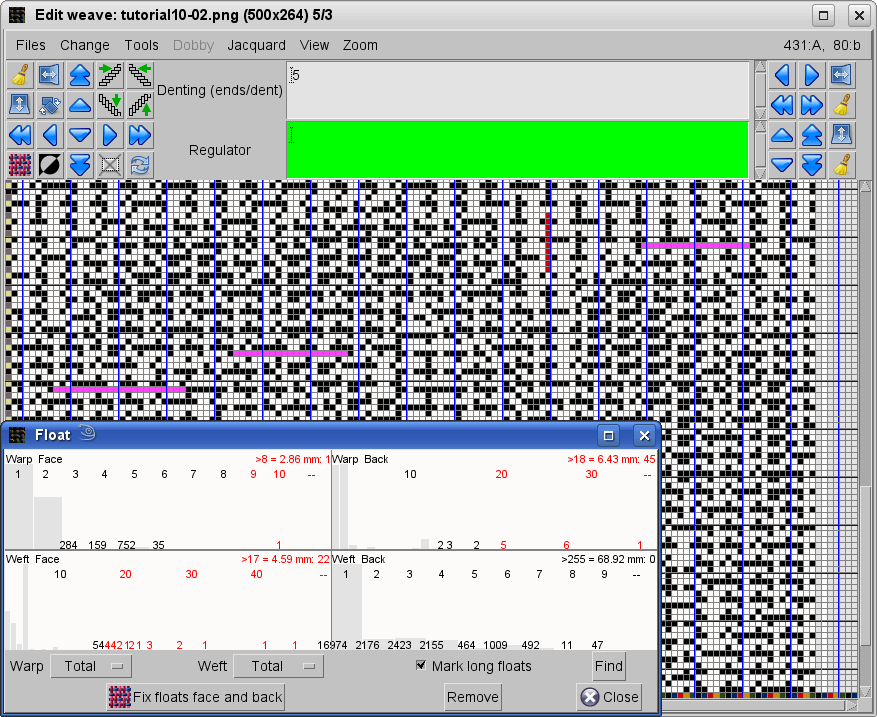
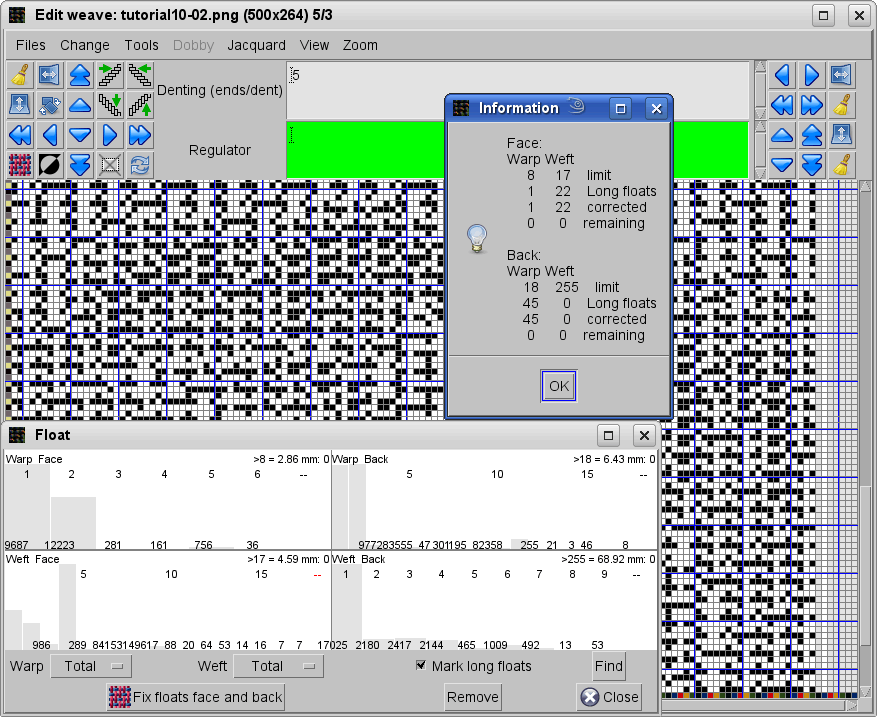
Before preparing a jacquard floppy for weaving, we must correct the long float errors.
In Edit weave window choose Change > Float. A window with separate graphical report of float length for warp, weft, face and back of the fabric will pop up. You may need to resize the window to see all the data. If there is enough space, the program will display the exact number of floats of length 1, length 2, length 3, etc. To see how many floats are longer than 8, just click on 8, and the program will sum up the total number of long floats and display them in red in the relative top right corner. Besides, it will also display the length of float over 8 threads in mm, according to the current density setting. By clicking on the float report, you set the length of the acceptable float. To see the location of errors, click on toggle button Mark, and weft long floats will be marked in red, while warp float errors will be marked in cyan. Only the errors on the face of the fabric will be shown. To see the long floats on the back side, negate the weave, or Reverse the fabric. Long float errors will be shown both in the weave window and in the main fabric display window, if the view mode is Weave or Integer.
Then click on the Fix floats face and back and the program will remove all floats longer than the selected threshold value. You will get the report about correction of long floats. If you will set reasonable long float limits, all the long floats will be removed automatically.
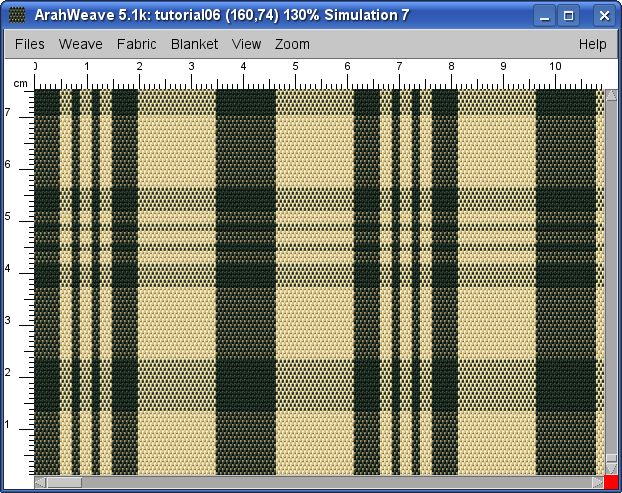
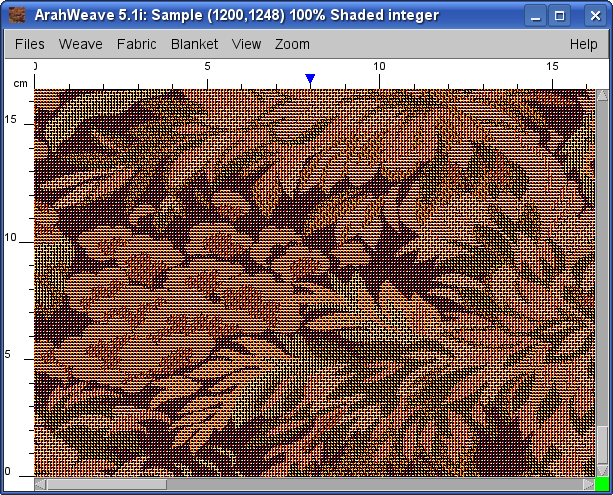
In many cases, a trained weaver will be able to tell if the fabric is correct or not, just by looking at the weave colored in warp and weft colors (what we call Integer view). Well, gobelin is not one of such cases. Anyone who still thinks that simulation is just a toy for people, who do not understand weaving, may continue to run back and forth between the loom and the CAD.
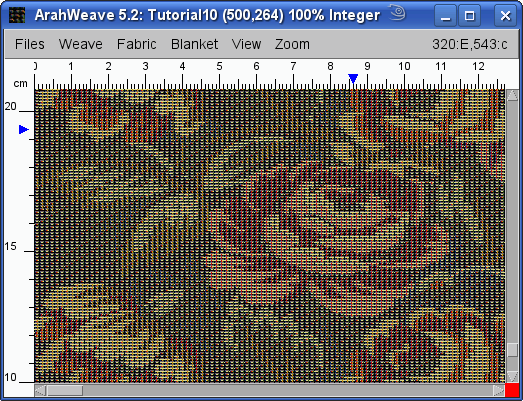
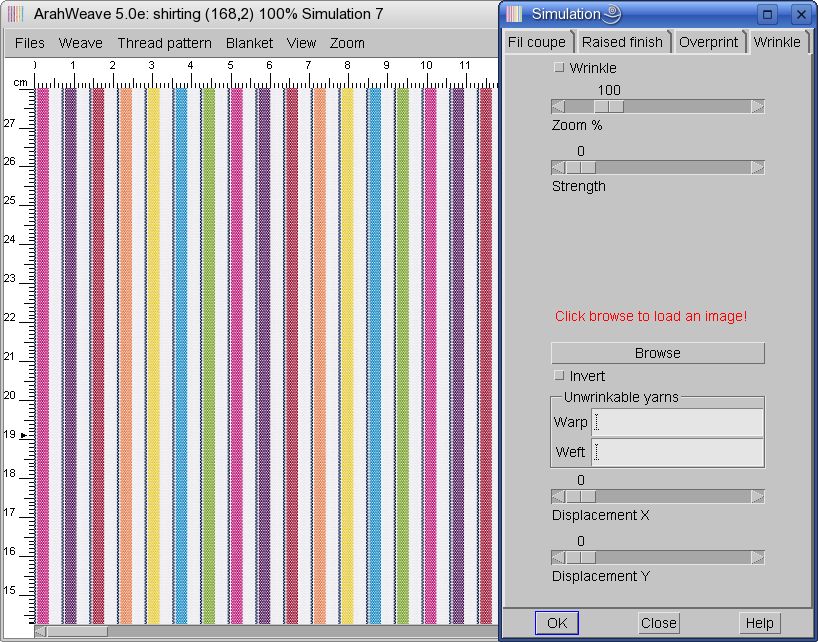
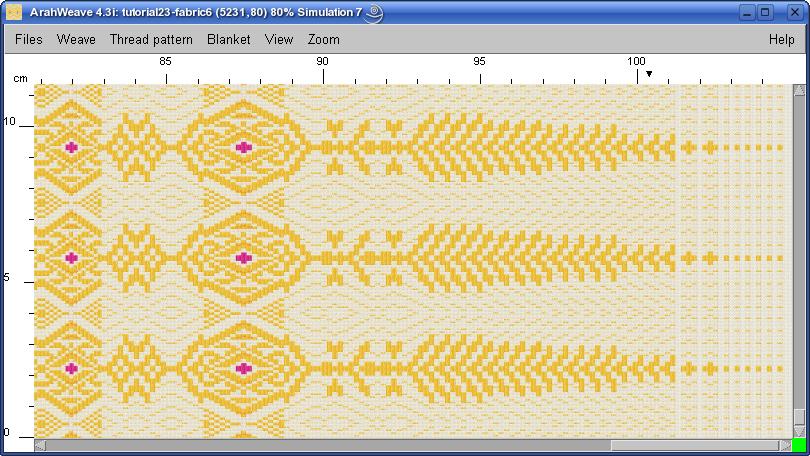
Users of ArahWeave will be pretty sure what they are going to get, by selecting View > Simulation in the main fabric window. There are 8 quality levels of the Simulation; higher number means higher quality.
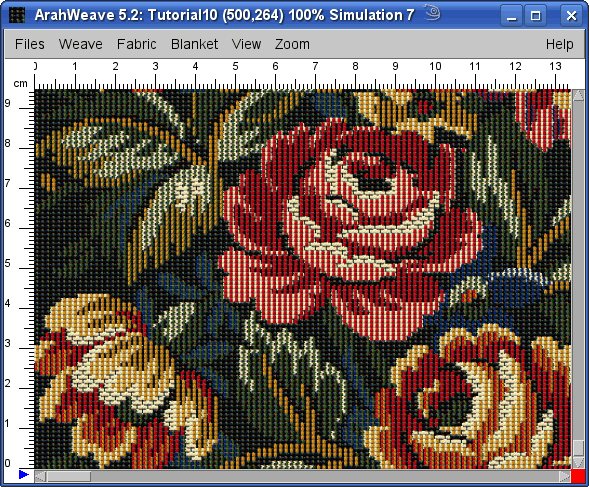
Note that we were not trying to match the colors of the fabric picture at the top of this tutorial, since it is based on a scanned photo from a book. From this point on, it is easy to save the weave in the jacquard format, like it is explained at the end of this tutorial. This one is already too long, so we are not going to repeat it here.
Any final words? First, we congratulate you, since you have read it to this point. We are even happier, if you understand it, and have learned something new. Probably you agree with us, that jacquard fabrics should be more expensive, since so much knowledge is needed to design them.
If you examine other gobelin fabrics, you will find out that their construction is remarkably similar to the principles, presented in this tutorial. The fact that gobelin weave construction was developed several centuries ago, proves that people are not getting any smarter. We just have better tools now. In many aspects, weaving is similar to programming: people wrote better programs, when they needed to punch cards in order to program a computer, since they were actually thinking before writing a program. Now we write the program while thinking about the problem, and we are satisfied as soon as something appears to be working. We will not mirror this metaphor into weaving, so we will not insult anyone. Take this as a challenge and try to develop a really novel weave construction, using the knowledge you have gained here.